How-to: Installing the EGN Background Process add-on solution for NAV submission (Hungarian legislation)
Introduction
This document describes the steps to
installing the EGN Background Process add-on solution for the NAV
online invoicing system functionality in Exact Globe Next.
Requirements
The following are the requirements that
need to be fulfilled before the solution can be installed:
Installing EGN Background Process in ELIS
- Go to Start ➔ All Programs ➔ Exact ➔ Exact Lightweight Integration Server Management Console to open the
ELIS management console.
- In the Exact Lightweight Integration Server
Management Console screen, click Console, and then select Check
for updates
- Under the Check for updates section,
select EGN Background Process under the Solutions category, as
displayed in the following example:
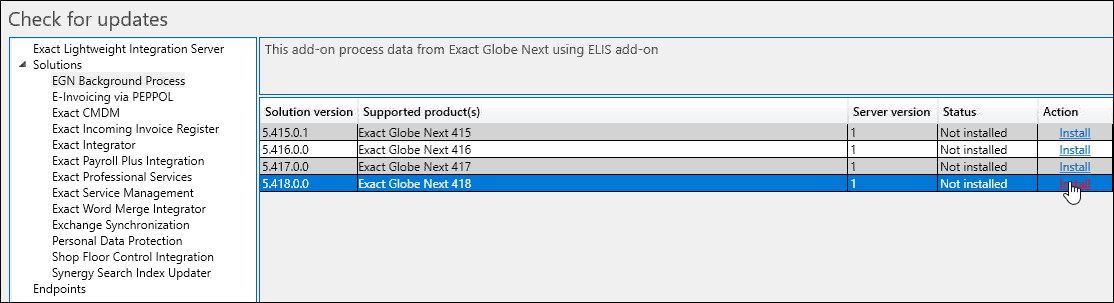
- Next, select the relevant product update in the Supported
product(s) column.
- Click Install in the Action column, and the ELIS
management console will download and install the EGN Background Process add-on
solution. Once the installation is completed, the installed solution will be
displayed on the left panel.
Linking the database to the EGN Background Process add-on
solution
- In the Exact Lightweight Integration Server Management Console
screen, click Products and select the Exact Globe Next application
on the left panel.
- Click Add, and the Add new client
screen will be displayed:
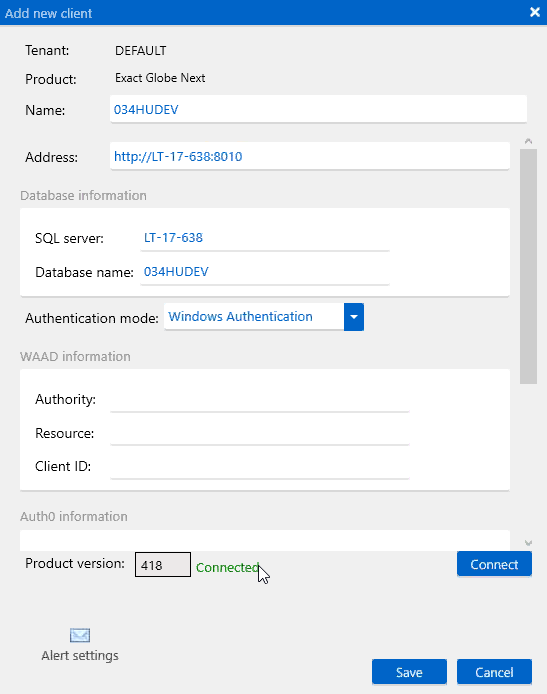
Note: The "8010" port must be used as the client address when adding a new client.
- At Name, define the name of the client
that will reflect the database that you will be using for the solution.
- At Address, define the web address of Exact
Globe Next based on the “http(s)://<servername>/<virtual directory
name>” format.
- Under the Database information section,
define SQL server and Database name.
- At Authentication mode, select Windows
Authentication.
- Click Connect. Once connected, the
product version will be displayed at Product version:

- Click Save.
- The database will then be added under the Exact
Globe Next section in ELIS, as displayed in the following example:

Invalid MAC Address2 error
In the case that the following error
message is displayed during the set up of the add-on solution, refer to the
below steps to solve the issue:
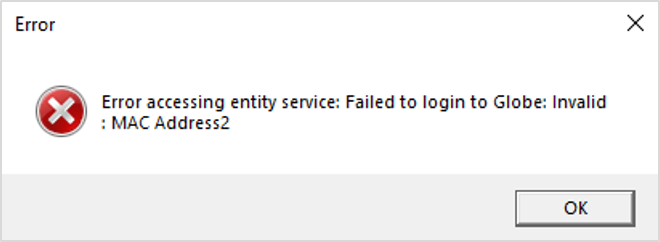
- In Exact Globe Next, go to System ➔ HR & Security ➔ Workstations. The Server overview screen will then be displayed.
- In the Server screen, click Add
services. A message will notify that the MAC address 2 has been generated.
- Click OK.
- Close Exact Globe Next and complete the set up
in ELIS by clicking Save.
- The database will then be added under the Exact
Globe Next section in ELIS, as displayed in the following example:

Configuring the EGN Background Process add-on solution
- In the Exact Lightweight Integration Server Management Console
screen, click Products and select the Exact Globe Next application
on the left panel. The Product: Exact Globe Next section will be
displayed.
- Next, click Solutions and then click the Add
button. The New configuration: EGN Background Process screen will be
displayed:
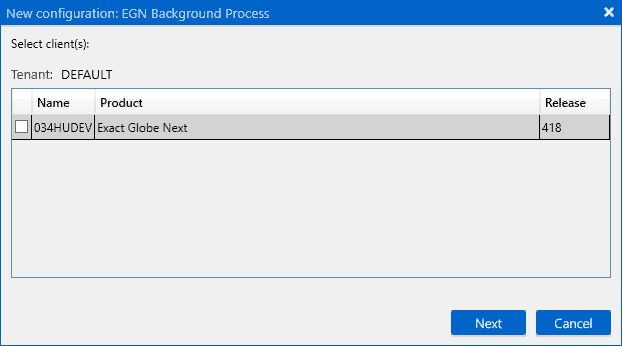
- Select the check box next to the database.
- Click Next. The New – Add-on
configuration screen will be displayed:
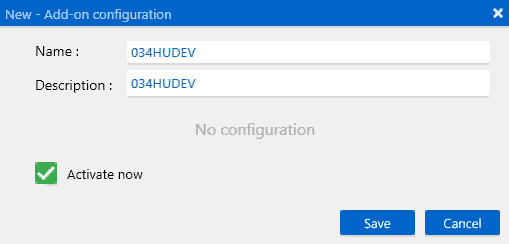
- Define Name and Description.
- Select Activate now.
- Click Save. A confirmation message will
be displayed:
- Click Yes to continue. The add-on solution will then be
activated.
Note:
- The functionality can only be enabled in General
settings in Exact Globe Next if the add-on solution has been successfully
set up in ELIS and the databases that will be used have been linked to
the add-on solution.
- The Process invoices setting is enabled
in General settings by default. When the setting is enabled, the final
processing of invoices will be performed by the add-on solution once the Process
button is clicked. The invoices can then be printed via the System ➔ General ➔ Notifications menu path.
| Main Category: |
Attachments & notes |
Document Type: |
Online help main |
| Category: |
|
Security level: |
All - 0 |
| Sub category: |
|
Document ID: |
28.904.544 |
| Assortment: |
Exact Globe+
|
Date: |
26-09-2022 |
| Release: |
|
Attachment: |
|
| Disclaimer |