|
|
Exact Synergy Enterprise: Installation manual
Description
This section contains a step-by-step installation guide. The following applications are required for installing ESE:
After installing the required applications, you can proceed with the installation of ESE:
Installing Microsoft .NET Framework
The Microsoft .NET Framework includes everything you need to run applications using the Microsoft .NET Framework and is therefore required before installing ESE.
The Microsoft .NET Framework can be downloaded directly from the Microsoft website.
After installing the Microsoft .NET Framework, you will have to register .NET with IIS.
To register Microsoft .NET Framework with IIS:
- Click the Microsoft Windows Start button, select Programs, Accessories, followed by Command Prompt.
- Type one of the following commands based on the processor type:
- C:\windows\Microsoft.NET\Framework\v4.0.30319\aspnet_regiis.exe -i (on a 32-bit processor).
- C:\windows\Microsoft.NET\Framework64\v4.0.30319\aspnet_regiis.exe -i (on a 64-bit processor).
- Next, press ENTER to register the framework. When it is completed successfully, the message Finished installing ASP.NET (4.0.30319) will be displayed.
- Type exit and press ENTER to close the command prompt window.
After installing Microsoft .NET Framework, you should ensure that the configurations are compatible with ESE by configuring the Microsoft .NET Framework.
To configure the Microsoft .NET Framework for ESE:
- Click the Microsoft Windows Start button, and then click Settings followed by Control Panel.
- Click Administrative Tools on the Control Panel, and then double-click on Internet Information Services (IIS).
- Next, right-click on Default Web Sites, and select Properties.
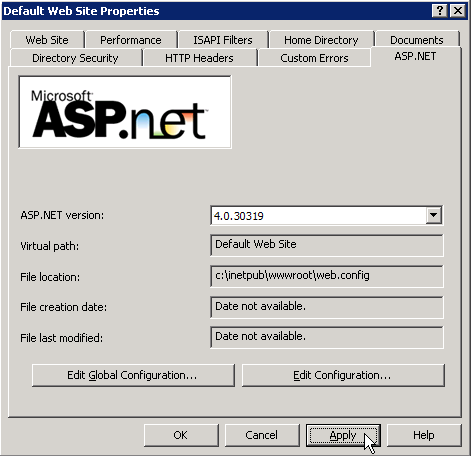
- Click the ASP.NET tab, ensure that the ASP.NET Version is 4.0.30319, and then click Apply.
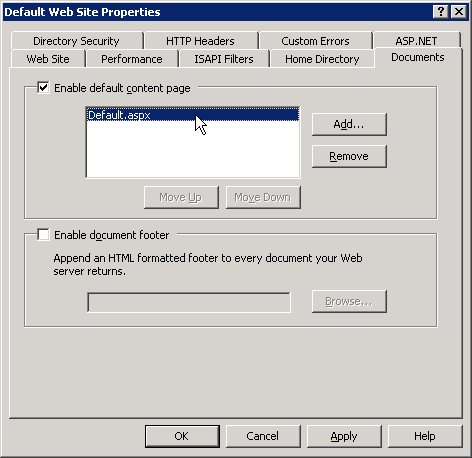
- Next, click the Documents tab, and select the Enable default content page check box. In the box, ensure that Default.aspx is available. Other documents can be removed. Now, click Apply.
- Click the Directory Security tab, and then click the Edit button at the Anonymous access and authentication control section.
- Clear the Enable anonymous access check box. Under the Authenticated access section, select the Integrated Windows authentication check box. You can also select the Basic authentication check box.
- Click OK, and then click Apply.
ESE uses validation and decryption keys for encryption, decryption, validation of forms-authentication data and out of process session state identification. Using the default (out of the box) validation and decryption key settings in IIS is not recommended. For better security and to prevent third party tampering of encrypted data, these keys should be changed.
To configure new validation and decryption keys if ESE is running on a single instance in a web server
- Launch Internet Information Services (IIS) Manager.
- On the left pane under Connections, locate and select Synergy Application under Sites.
- In the center pane under the ASP.NET section, click Machine Key.
- Check Automatically generate at runtime option for both Validation key and Decryption key sections.
- In the right pane, click Apply to save the changes.
To configure new validation and decryption keys if ESE is running on a Web farm
- Launch Internet Information Services (IIS) Manager.
- On the left pane under Connections, locate and select Synergy Application under Sites.
- In the center pane under the ASP.NET section, click Machine Key.
- In the right pane, click Generate Keys to generate a new set of validation and decryption keys.
- Click Apply to save the changes.
- Copy the Validation Key and Decryption Key across all ESE instances in the farm.
Downloading and installing ESE
To install ESE based on the Microsoft .NET Framework, you can download the necessary files with the ProductUpdater. Alternatively, you can also install ESE using Windows Installer (MSI) packages. For more information, see Installing and updating ESE with Microsoft Windows Installer.
Note: An ESE installation carried out using ProductUpdater cannot be updated using the MSI installer and vice versa. For more informaton, see How-to: Replacing ESE installed using Productupdater with Windows Installer.
Just like the software itself, the ProductUpdater is available in multiple languages. To
access the product updater, go to the Exact
Synergy Enterprise folder, double-click the bin folder, and then double-click ProductUpdater_T15.exe.
Caution: The ProductUpdater_T8 that is used for Exact Synergy cannot be used to install ESE.
To install ESE:
- Double click ProductUpdater_T15.exe. You will see the following screen:
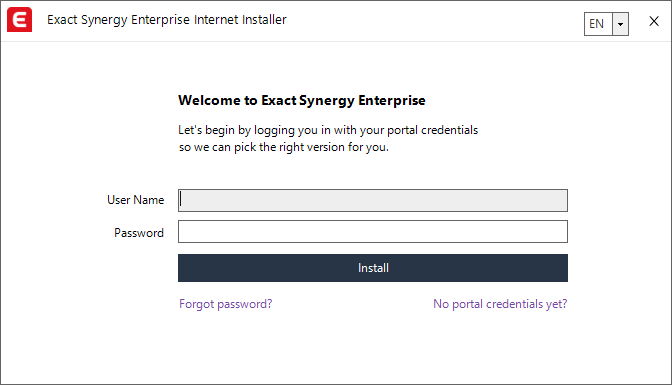 
- Enter your portal credentials and click Install. You will see the following screen:
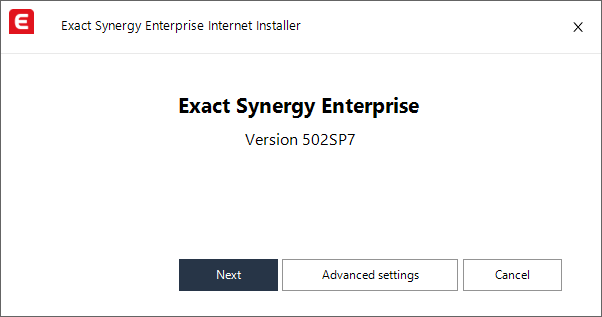 
- Click Next to install with the default settings. Click Advanced settings if you want to change the default settings.
- If you click Advanced settings, you will see the following screen:
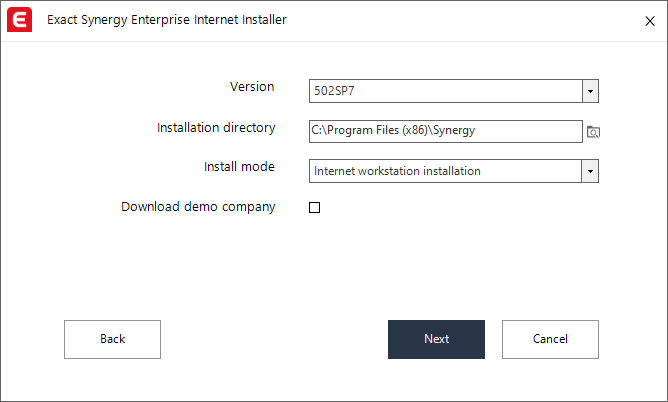 
- You can change the following options:
- Version - Select the version you want to download.
- Installation directory - Specify the installation directory.
- Install mode - Select the
relevant installation method.
- Select Download demo company to include a demo company in your installation.
- After clicking Next, the application will determine the files that should be installed. When done, you will see the following screen:
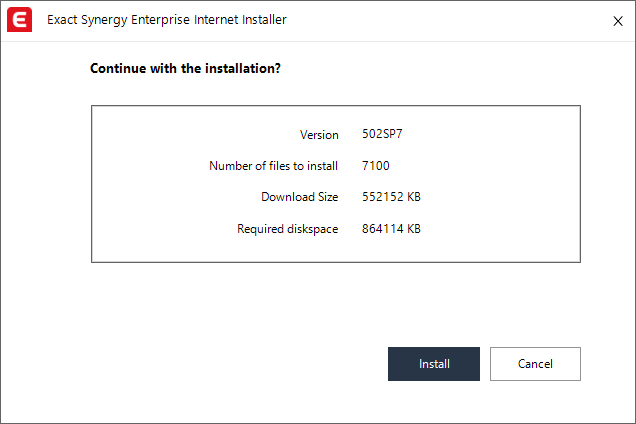 
- Click Install to continue, or Cancel to cancel.
Note: After the download has been completed, a default virtual directory called “Synergy” will be created in IIS. The IIS will also be configured as described in Installing Internet Information Services.
- When the installation is completed, you will see the following screen that also reminds you to update the related products:
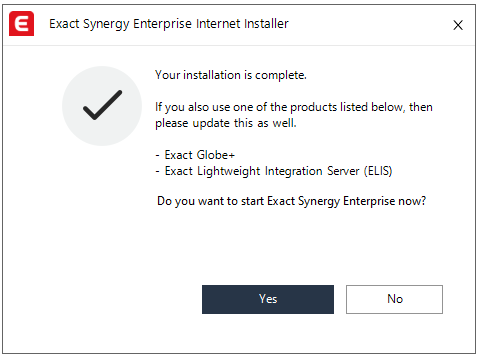 
- Click Yes to start ESE, or No to cancel.
Browser settings
Since ESE is supported by
different browsers, before you create a new database (for Microsoft Windows
authentication), you need to configure the browser settings to ensure the
database creation process run successfully.
To create a database via Microsoft Internet
Explorer:
- Right-click on the Microsoft Internet Explorer
icon.
- Click Run as administrator.
- Run ESE and create the
database.
To create a database via Mozilla Firefox:
- Right-click on the Microsoft Internet Explorer
icon.
- Click Run
as administrator.
- Type “about:config” in the location bar. The
message “This might void your warranty!” will be displayed.
- Click I’ll
be careful, I promise!.
- On the search bar, type “network.automatic-ntlm-auth.trusted-uris”.
- Double-click the preference name that is
displayed on the list and add the domain of your intranet website.
- On the search bar, type “network.negotiate-auth.trusted-uris”
and repeat step 6.
- Run ESE and create the
database.
To create a database via Google Chrome
- On Microsoft Windows, go to Start à
Control Panel à Internet
Options, and then click the Security tab.
- Click Trusted
sites, and then click Custom level.
- Under the Authentication
section, select the Automatic logon
with current user name and password option, and then click OK.
- Click Trusted
sites, and then click Sites.
- At Add
this website to the zone, add the domain of your intranet website, and then
click Add.
- Run ESE and create the
database.
Creating database
When you start up ESE, you are required to provide a valid license type for ESE. The license file for Exact Synergy is no longer valid. If you have selected the appropriate license file, you are allowed to create a database.
To create a database:
- Run ESE.
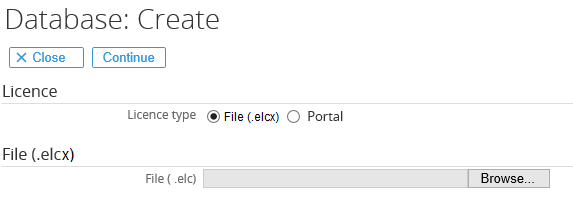
- Select File (.elcx) at License type and click Browse to
select the license file. License files have an .elcx extension and can be
downloaded from the customer portal. Alternatively, select Portal at
License type and define your customer portal login credentials at Domain,
User name, and Password, under the Portal section to
download the license file directly from the customer portal.
- Click Continue. The following page will be displayed:

- Click Create a new ESE database hyperlink. You will see the following page:
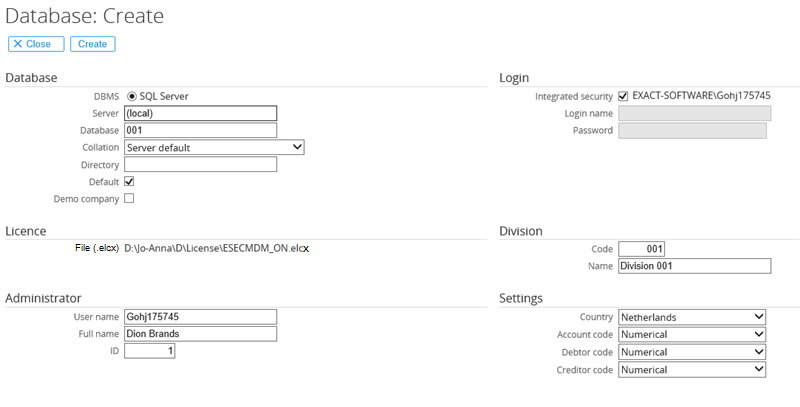
- Under the Database section, type the name of the server at Server where the database is created.
- Next, type the name of the database at Database. This is mandatory and cannot be edited once it is created.
Note: When creating a new database, it is important to decide on the database name. It is advisable to use “Synergy” as the database name for first time users. By having a name other than “Synergy”, a separate virtual directory will be created in the Internet Information Server.
- At Collation, you can select Server default or International (Latin1_General_CI_AS) to specify that you want to use the default database server or international (Latin) collation for your database respectively.
- Select the Default check box to make this database the default database. When you log in to ESE, this is the database that will be shown as default.
- Under the License section, the selected license that will be used to create the new database is displayed.
- Under the Administrator section, type the user name of the administrator at User name. This should be the login of the user for the Windows NT server.
- Next, type the full name of the administrator at Full name.
- At ID, type the identification number for the administrator. This ID is the starting number, in which subsequent user(s) will have the following number(s). For example, if the ID of the administrator is “1”, the next user will have an ID of “2”.
Note: By default, the information in the Administrator section will show the details of the person who is creating the database.
- Under the Login section, select the Integrated security check box to use the user account of the person who is creating the database. This user account will be used to make a connection to the SQL server when logging in to the new database.
- Type the login name and password at Login name and Password respectively.
Note: You can only type the login name and password if the Integrated security check box is not selected in step 11.
- Under the Division section, type the division code for the new database at Code. You can type up to a maximum of three digits. A division code of a database functions as a company code. This is mandatory.
- Type a division name for the new database at Name.
Note: The Division section is disabled if you have selected the Demo company check box under the Database section.
- Under the Settings section, select the country of the new database at Country.
Note: This field is disabled if you have selected the Demo company check box under the Database section.
- At Language, select the language to be used in your new database.
- Select the required setting for the account code. Select Numerical to use only numbers to set the account codes or Alphanumerical to allow both numbers and letters to be used for account codes. Numerical is the default setting. Be aware to NOT change this to Alphanumerical when there is a replication with the back office.
- Select the required setting for the debtor code. Select Numerical to use only numbers to set the debtor codes or Alphanumerical to allow both numbers and letters to be used for debtor codes. Numerical is the default setting. Be aware to change this to Alphanumerical when there is a replication with the back office.
- Select the required setting for the creditor code. Select Numerical to use only numbers to set the creditor codes or Alphanumerical to allow both numbers and letters to be used for creditor codes. Numerical is the default setting. Be aware to change this to Alphanumerical when there is a replication with the back office.
- Click Create to start creating the new database.
Configuring existing database
After the new database is created, you have to make sure the following configurations in IIS are set.
The database configuration is stored in the db.config file in the root of your ESE installation directory. This is created when a new database is created or an existing database is opened. In Exact Synergy, this file was called baco.cfg.
After the file db.config is automatically created, you can put information of other database in the db.config in order to run other databases on ESE. You can open the db.config in Notepad and it will look like this:
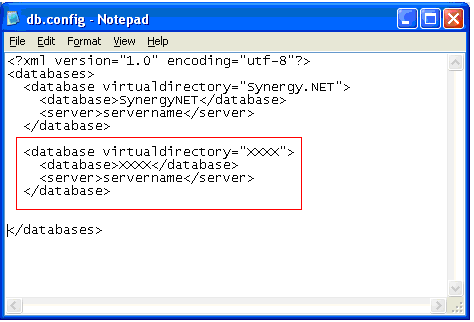
You can easily add new databases by using the example shown. Of course the virtual directory that you specify must exist in the Internet Information Services application.
Opening existing database
When you want to open an existing ESE database, you need to select the corresponding hyperlink. If the database of an Exact Synergy version is selected, the database will automatically be updated to the current version installed.
If this is a database that was created in the Exact Synergy environment, then you need to read the Conversion manual for converting this database correctly to ESE.
Note: You need to have at least Exact Synergy product update 372 in order to convert the Exact Synergy database to ESE.
To open an existing database:
- Run ESE. You will see the following page:

- Click the Open an existing ESE database hyperlink. You will see the following page:
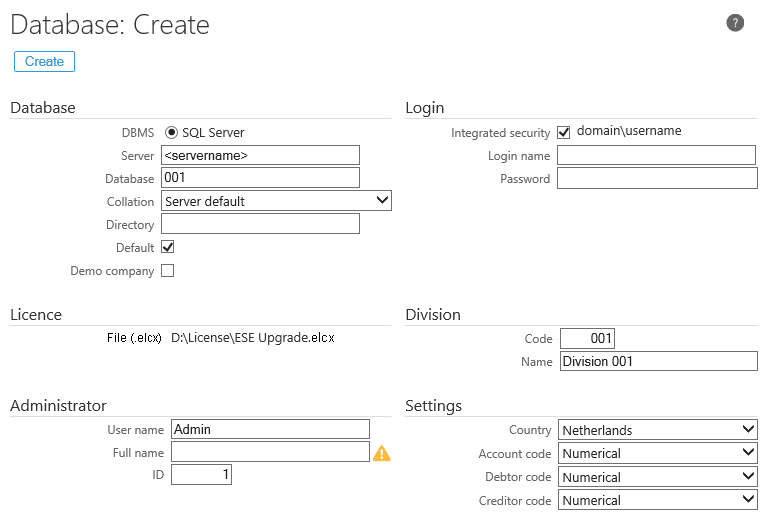
- Under the Database section, type the name of the server for the existing database at Server, and the name of the existing database at Database.
- Under the License section, the selected license that was used to create the new database is displayed.
- Select the Integrated security check box under the Login section to use the user account of the person restoring the database to connect to the SQL server when logging in to the database. Alternatively, type the login name and password at Login name and Password respectively. You are only able to do this if you have the sufficient rights.
- Click Open to open the existing database.
Additional step for Federated Identity users
If you use Federated Identity (FiD), it is recommended that you run FiD Configurator so that the relevant configuration files can be regenerated to continue using FiD. After installation of is complete and if you are using FiD, you will be reminded to run FiD Configurator. For more information on FiD, see Federated Identity Configurator.
| Main Category: |
Attachments & notes |
Document Type: |
Online help main |
| Category: |
|
Security level: |
All - 0 |
| Sub category: |
|
Document ID: |
14.139.246 |
| Assortment: |
Exact Synergy Enterprise
|
Date: |
07-03-2024 |
| Release: |
503 |
Attachment: |
|
| Disclaimer |
|
|
|