Introduction
This document describes the SKU receipt process in E-WMS when SKU Management
is enabled. The details are based on product update 405.
Description
After SKU Management has been properly
set up, and SKU types and items have been
configured, you can start receiving SKUs in WMS Receipts Registration.
After creating and processing (printing) a purchase order for one or more SKU
items, you can start the E-WMS Control Center to handle the receipts.
This
document contains following process steps:
This document gives a schematic and visual presentation of the 'flow' for
E-WMS SKU receipts.
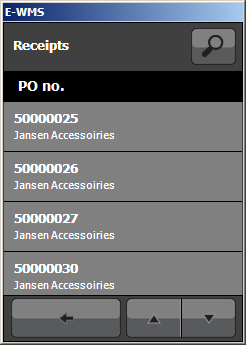
Control Center status 'new'
Start the Control Center Receipts in menu WMS, To be processed, Purchase
Receipts, Control Center.
Select one or more purchase orders to be received, and press the button
Send to scanner.
Depending on your settings you can encounter the windows:
Filter order lines, Send to scanner (communication type) and
Scanner (group) selection.
After sending, the selected lines will have status 'picking' in the Control
Center.
Receiving on the hand terminal
On the hand terminal, select menu 2 - Receipts and 1 - Receipts
and select (or scan) the purchase order to be received.


After selecting the purchase order, you may see a list of order lines,
depending on your settings. If not, you can enter or scan the item code:


Printing SKU labels
After entry of the item code, WMS will check if this is a SKU
item.
SKU labels can be printed using the SKU label printing screen. Whether the
SKU label printing screen appears automatically depends on the setting
Auto. SKU label screen.
Please note: when you have configured your hand terminal settings to prefill
and hide the receipt location, then the focus will immediately go to 'quantity'
after scanning the item code.
You would then, from the quantity field, have to press OPTIONS and SKU, to print
SKU labels; but the SKU number has to be scanned before entry of
quantity.
To avoid this scenario, please enable the hand terminal setting 'Auto. SKU label
screen', then the SKU print screen is automatically shown after scanning the
item code.
E-WMS remembers whether you printed labels earlier, for a specific item in a
specific order. When labels were printed earlier, then the SKU label screen
would not show but a SKU number can still be scanned.
If the label print screen does not show automatically, or you need additional
labels, you can press press the
OPTIONS button and choose the SKU menu button to start the SKU label screen
(in IE/ERF client: button
 ).
).
If more than one SKU configuration is found, you will see a list of available
SKU configurations in the SKU label screen. If only one configuration exists, it
will be selected automatically. Please select the appropriate SKU configuration.
The number of ordered sales units from the order line will show as suggestion to
print labels for:

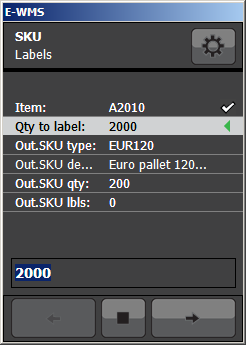
The following information is displayed:
| Item |
Item code |
| Qty to label |
The expected quantity in sales units to be received |
| Out.SKUType |
The selected SKU type code |
| Out.SKUDescr |
Description for this SKU type |
| Qty.outerSKU |
Number of sales units per SKU type |
| Out.SKU Lbls |
Number of labels to print
(sales units / sales units per SKU) |
If you receive less or more sales units (as a total for this receipt, not
per SKU), please change the total quantity accordingly.
From the entered quantity, the number of labels (SKUs) will be calculated,
rounded up, in case of a last incomplete SKU.
In this sample, labels for 5 pallets are now to be printed:


After confirming the number of SKU labels, the printing will be done
automatically by BarTender Commander, when properly
configured.
These labels must be applied to the received SKUs (pallets or boxes), so scanning and
registration of the SKU numbers can start.
From
product update 405 it is possible to scan 'external' SSCC numbers as SKU
number. Otherwise only numbers generated by E-WMS are accepted as valid SKU numbers.
Receipt
Now the actual receipt can start:
- scan location (when not prefilled and skipped)
- scan the SKU number. You can scan the same SKU number more than
one time, as long as that SKU number was already part of the same receipt
transaction.
You can only use one item (and one batch) per SKU number.
- if the item is a batch item: scan batch
- in input of batch start/end date is required: scan dates
- quantity in sales units for this SKU, will be prefilled
with the standard quantity configured for this SKU type.


When receiving a batch item, the batch will have to be scanned after scanning
the SKU number. At the moment, you can only use one batch per SKU but this is
not validated in the ASP receipt process.
When receiving a serial number item you will scan a serial number multiple
times, after scanning the SKU number, until the SKU quantity is reached or your
press the STOP button.
Now the next SKU is expected, with again (batch and) quantity, until the
ordered quantity is reached, or until you press the STOP button (or in IE/ERF
client: one of the buttons
LINE READY or READY).
Reading back and processing
The picked lines which are 'ready' on the hand terminal, can be read back in
the Control Center Receipts, after selecting Picking at the Status field, or can be read back
automatically when the RF Receipts service is up and running.
Depending on your settings, the receipts can be validated and processed
automatically after reading back. When these steps are not started
automatically, it is possible to open a receipt and show the SKU receipt lines.
The SKU numbers can be changed, and are still validated when doing so (so
they have to exist).
After processing, the Exact Globe Next shelf stock is updated with the total quantity
received. SKU details are only visible in WMS reporting tools, as there are:
- WMS, Reports, Item/Stock view (SKU stock details per item
including E-WMS stock reservations)
- WMS, Reports, SKU transaction history (SKU transaction details)
- WMS, Reports, SKU stock (SKU shelf stock positions)
The next step would be to
transfer these SKUs from the receipt location to warehouse bulk locations.
Related documents