How-to: Installing XML Mapping Task Pane for Microsoft Word
Introduction
The new Exact Word Merge application offers a wide range of improvements over the mail merge functionality. Among them is a new method of creating Word Merge templates directly in Microsoft Word. In order to create templates, XML Mapping Task Pane must first be installed in Microsoft Word. This is done via a third party add-on (the CodePlex). Installing XML Mapping Task Pane for Microsoft Word will add a new button, XML Mapping, to the Developer ribbon.
In Microsoft Word 2013 and higher, there is a built-in XML Mapping Task Pane which provides the same functionality. Hence, it is recommended to use this built-in feature if you are using Microsoft Word 2013 and higher.
Note: By downloading XML Mapping Task Pane for Microsoft Word 2010 (the “task pane”), you agree that your use is subject to the license terms and conditions located at http://xmlmapping.codeplex.com/license. Additionally, by downloading the task pane, you further acknowledge and agree that you assume all risks in using the task pane, and Exact provides no warranty or support for the task pane. Exact disclaims any losses, claims, damages, and liability whatsoever that may arise from your download and use of the task pane.
Description
This document is divided into the following sections:
Return to top
Requirements and prerequisites
Before installing XML Mapping Task Pane, users must ensure they have the relevant requirements and prerequisites. For more information, see Hardware and software requirements for Exact Synergy Enterprise.
If any of the prerequisites are not installed, the setup will download and install them automatically, but a reboot may be required.
Return to top
How do I download and install XML Mapping Task Pane?
To download and install XML Mapping Task for Microsoft Word, observe the following steps. However, if you are using Microsoft Word 2013 and higher with the built-in XML Mapping Task Pane, you can go directly to Enabling XML Mapping Task Pane in Microsoft Word.
a. Downloading XML Mapping Task Pane
-
Open an Internet browser and go to https://archive/codeplex.com?p=xmlmapping.
The following page will be displayed:

-
Click Download
Archive in the website to download the xmlmapping.zip file.
-
Unzip the downloaded zip file.
-
Go
to the Releases folder, and then go
to the 0 folder.
- Right-click on the “6e2c7cf1-3f41-4b2b-a5e5-3aff5571692a”
file, and click Rename.
- Rename the file, and add the “.exe” extension.
- Use this .exe file to install the XML Mapping
Task Pane.
Return to top
b. Installing XML Mapping Task Pane
-
Before starting the installation, close all opened Microsoft Word documents to allow the installation to run successfully. Locate the installation file and double click the file to begin the installation. The following warning message will be displayed:

-
Click Run to continue. The following screen will be displayed:

-
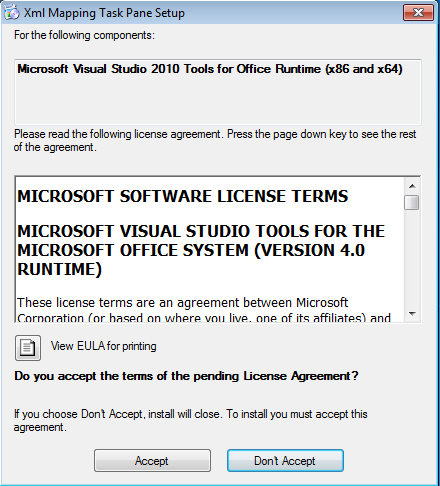
If Microsoft.NET Framework 4 Client Profile, Microsoft Visual Studio 2010 Tools for Office Runtime, or Windows Installer 3.1 is not installed, the following screen will be displayed:

Click Accept to install the prerequisites. If these prerequisites are already installed on your computer, proceed to step 4.
-
The installation will proceed and the following screen will be displayed:

-
Click Install to start the installation. Upon successful completion of the installation., the following screen will be displayed:

-
Click Close to exit.
Return to top
c. Troubleshooting when XML Mapping Task Pane does not install properly
-
During installation, you may encounter the following error:

-
To troubleshoot this error, locate the installation file.
-
Right click on the installation file and select Properties.
-
In the XMLMappingTaskPane Properties screen, click Unblock.
-
Install again as per instructions in Installing XML Mapping Task Pane.
Return to top
d. Enabling XML Mapping Task Pane in Microsoft Word
Upon successful installation of XML Mapping Task Pane, users will have to enable the Developer tab ribbon to access the XML Mapping button.
-
Click File on the main menu.
-
Click Options.
-
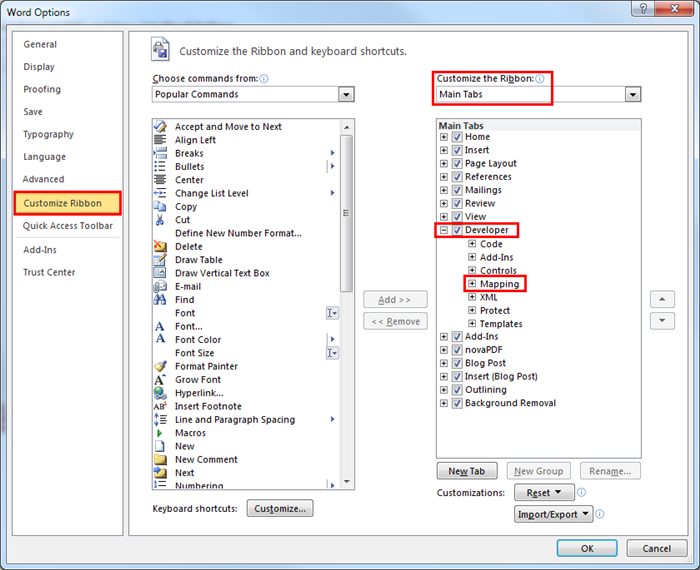
In the Word Options screen, click the Customize ribbon.
-
Select Main Tabs at the Customize the Ribbon field.
-
Select the Developer check box, as displayed in the following:


-
Click OK.
Return to top
Related documents
| Main Category: |
Attachments & notes |
Document Type: |
Online help main |
| Category: |
|
Security level: |
All - 0 |
| Sub category: |
|
Document ID: |
23.570.569 |
| Assortment: |
Exact Synergy Enterprise
|
Date: |
02-08-2019 |
| Release: |
251 |
Attachment: |
|
| Disclaimer |