|
|
WMS: meaning of the buttons (ERF client)
Introduction
This document describes the meaning of the buttons in the WMS ASP ERF
client.
Description
Picking screen
| |
|
 |
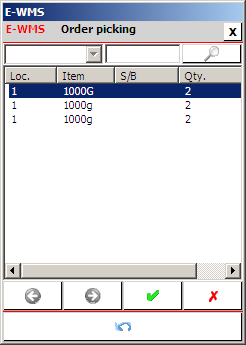
Edit button |
| |
Available in guided picking transactions: shows a
browser with previous picked lines, to edit or delete a previous scanned
line: |
| |

 |
| |
|
| |
 open selected line to edit
 |
| |
 delete selected picking line (no further confirmation)
 |
| |
|
| |
When deleting a picked line, the advice line
which was linked to that picked line, will be re-opened and has to be
picked again. |
| |
Using this button and selecting a line to
edit, puts the scanner in 'edit mode' (indicated with text 'edit' on the
screen). |
| |
The 'edit' mode is automatically ended after
confirming all values of the edited line. |
| |
|
| |
|

 |
Instruction button |
| |
Shows order line instruction (again).
Disabled when there is no instruction to show. |
| |
In WMS Replenishment, the instruction is
used to show the replenishment target location. |
| |
In WMS Receipts with cross docking, the instruction text
is used to show the sales order to 'cross dock' for. |
| |
|
| |
|

 |
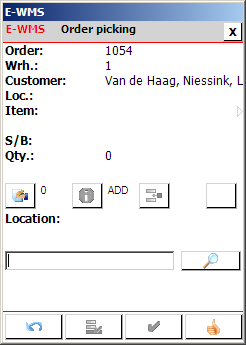
Add button |
| |
Add an extra (unplanned) line to guided
receipts or guided issues. |
| |
Puts the scanner in 'add mode' and opens a
new receipt or issue screen. |
| |
Press the 'Ready' button to end the 'add'
mode and return to the normal flow. |
| |
|
| |
 |
| |
|
| |
Note: the 'add mode' was not indicated
for some time in WMS, it is indicated again from product update 403. |
| |
|
| |
|
 |
Back button |
| |
Back to previous screen |
| |
When using BACK in a picking screen: please
note that the current picking line will NOT be SAVED when using BACK. |
| |
|
 |
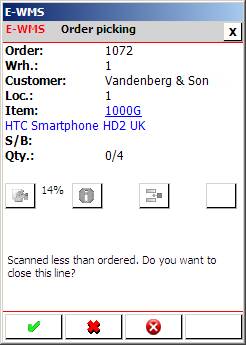
Line Ready button |
| |
Indicates that you are done with the current
advice line. |
| |
If not all is picked yet, you will see the
question "Scanned less than ordered. Do you want to close the line?" |
| |
with choices "Yes", "No" or "Cancel": |
| |
 |
| |
 Yes: close the line, assume remainder will
not be picked anymore (status of line = ready)
Yes: close the line, assume remainder will
not be picked anymore (status of line = ready) |
| |
 No: don't close the line. Remainder
will still be picked (maybe from other location or other batch), status
of line = not ready
No: don't close the line. Remainder
will still be picked (maybe from other location or other batch), status
of line = not ready |
| |
 Cancel: back to previous screen (no changes).
 |
| |
|
| |
Note: for serial number items, the Line
Ready button is applied per serial number, not per item. |
| |
|
| |
|
 |
Ready button |
| |
Indicates that you are done with the whole order, not just with the current order line. |
| |
Not available in all WMS processes, for example not in
order picking. |
| |
Note : using this button does currently
not always result in the "Scanned less than ordered ...." confirmation
screen |
| |
when lines still would have to be picked, for example in order packing.
|
| |
|
 |
Continue or Next button |
| |
This button is the same as ENTER after a
scan: continue to the next screen. |
| |
|
| |
|
| |
|
Generated SSCC
When WMS 'generated SSCC' is enabled, you are able to print box- and pallet
labels from the hand terminal, during order picking.
Enabling this functionality adds extra buttons to the picking screen.
| |
|
| |

 |
| |
|
 |
SSCC button: Open the SSCC generation and
printing screen, to print new labels |
| |
|
 |
print shipment label |
| |
|
 |
print pallet label (only when a SSCC number has been
generated first) |
| |
|
 |
print box label (only when an inner SSCC number has been
generated first) |
| |
|
 |
generate new SSCC (pallet) number |
| |
|
 |
generate new inner SSCC (box) number |
| |
|
 |
close the label screen |
| |
|
| |
|
|
Related documents
| Main Category: |
Support Product Know How |
Document Type: |
Support - On-line help |
| Category: |
On-line help files |
Security level: |
All - 0 |
| Sub category: |
temporary |
Document ID: |
19.688.687 |
| Assortment: |
E-WMS
|
Date: |
26-01-2012 |
| Release: |
|
Attachment: |
|
| Disclaimer |
|
|