How-to: Setting up Exact Integrator in Exact Lightweight Integration Server (ELIS)
Introduction
Exact Integrator (EI) is a solution that provides real-time integration
between Exact Synergy Enterprise and Exact Globe Next whereby data is
transferred in real-time between Exact Synergy Enterprise and Exact Globe Next
when changes take place in the system.
Scope
This document describes the following:
- Setting-up the Exact Integrator solution
in ELIS
- Configuring Exact Integrator
Pre-requisites
To start the setup, the server must have
the following:
Setting-up
The following screen will be displayed
after you have logged in to ELIS:
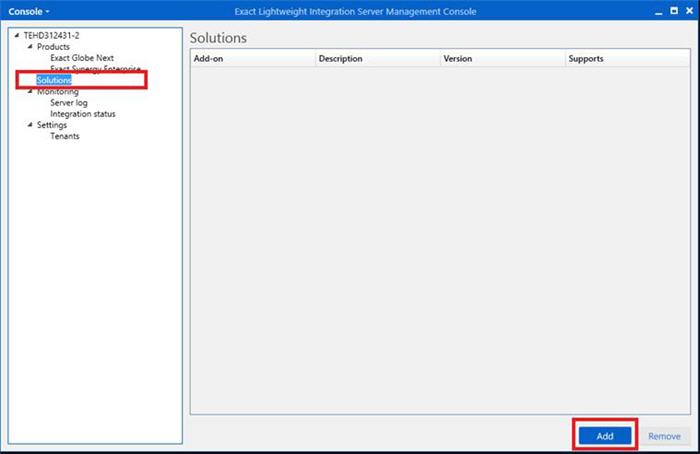
To set up the solution, select Solutions
under Products on the left panel in the Exact Lightweight Integration
Server Management Console screen, and then click Add. The following
screen will be displayed:
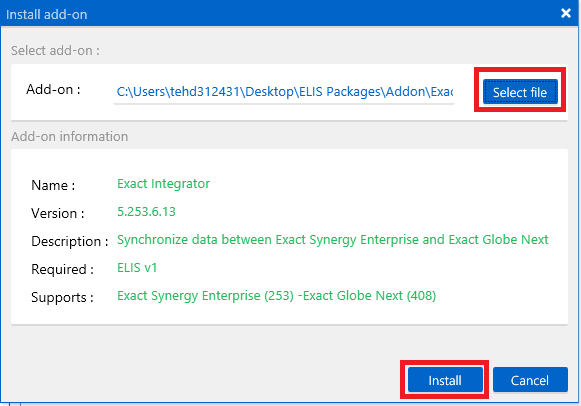
Note: The Install
add-on screen is used to set up the extended solutions. To set up the Exact
Integrator solution, the Exact Integrator package
(ExactIntegratorAddon.zip) is required. To download the Exact
Integrator package, see Getting started with Exact Lightweight Integration Server (ELIS).
In the Install add-on screen, click Select
file at Add-on under the Select add-on section to select the Exact
Integration solution package. The details of the solution will be displayed
under the Add-on information section. Click Install to install
the Exact Integrator solution. The following screen will be displayed:

Once the installation has completed, Exact
Integrator will be displayed under Solutions on the left panel and under
the Solutions section.
After setting up the Exact Integrator
solution, you have to configure and activate the solution before the solution
can be used.
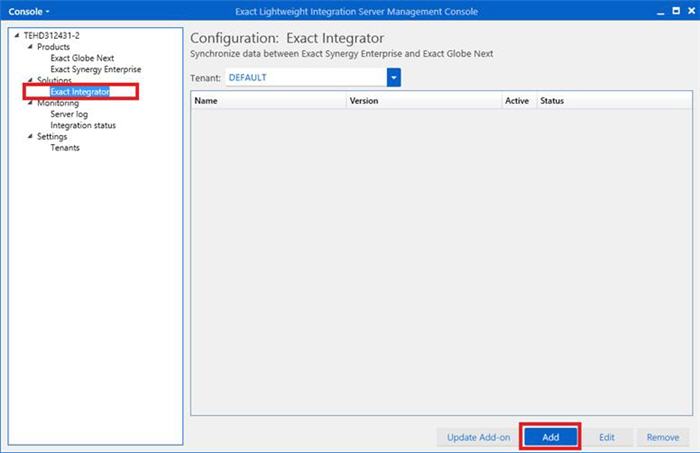
To activate the Exact Integrator
solution, click Exact Integrator under Solutions on the left
panel, and then click Add. The following screen will be displayed:
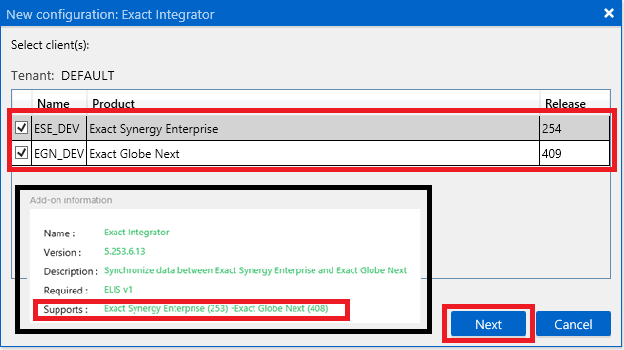
In the New configuration: Exact
Integrator screen, select a product under the Select client(s)
section, and then click Next. The following screen will be displayed:
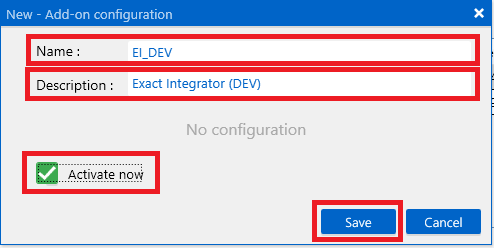
In the New – Add-on configuration
screen, type the name of the configurator at Name and the relevant description
at Description. Select the Activate now check box to activate the
solution, and then click Save. The following screen will be displayed:

Related documents
| Main Category: |
Support Product Know How |
Document Type: |
Online help main |
| Category: |
On-line help files |
Security level: |
All - 0 |
| Sub category: |
Details |
Document ID: |
26.179.518 |
| Assortment: |
Exact Synergy Enterprise
|
Date: |
22-04-2015 |
| Release: |
|
Attachment: |
|
| Disclaimer |