EN Serviceaufträge anlegen und verwalten
Dieses englische Dokument werden wir so bald wie möglich für Sie übersetzen.
Introduction
In dieser Software you can create or edit service orders under E-Service contract. Service orders are created when orders are received from customers.
Menu path
Go to Service/Entries/Service orders, and then click New to create a new service order, or Open to edit an existing service order.
Description
The creating and maintaining service order function consists of the following sections:
A list of options appears if you click  in the Ordered by box, Resource box, and other boxes. From the list, make your selection and click Select.
Service order header
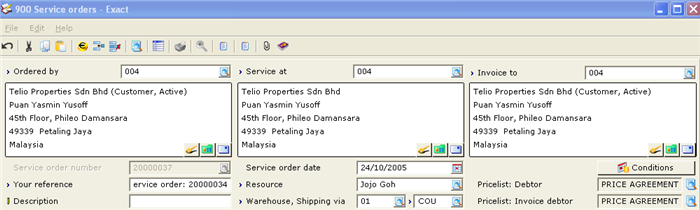
Note: If you do not want to define all the boxes in the service order header (skip the service order header) such as the Service order date, Your reference, Resource, Warehouse, and Shipping via boxes, go to System/General/Settings, under Order settings, select the Skip order header check box in the Entry section.
Ordered by
Type or select the ID or name of the debtor who placed the service order. This is mandatory.
Note: The Ordered by box is enabled only if the service order has not been completed.
Service at
Type or select the ID or name of the debtor who will be receiving the items. By default, the Ordered by debtor will be displayed. This is mandatory.
Note: The Service at box is enabled only after the Ordered by debtor is defined.
Invoice to
Type or select the ID or name of the debtor who will be receiving the invoice. By default, the Invoice debtor defined for the ordered by debtor at the debtor maintenance (go to Finance/Accounts receivable/Maintain and select the relevant debtor, under the Financial tab in the Sales order – Invoice section for the Advanced mode or under the Logistics tab in the General section for the Simple mode) is displayed. Otherwise, the Ordered by debtor is displayed. This is mandatory.
Note: The Invoice to box is enabled only after you have defined the Ordered by debtor, and only if the service order has not been completed.
 Maintain
Click to view or edit the selected debtor’s details. For more information, see Creating and Maintaining Accounts.
Note: Changes made to the debtor’s details will be reflected in the debtor maintenance (go to Finance/Accounts receivable/Maintain, select the relevant debtor, and then click Open).
Note: This icon is enabled only after you have defined the Service order number.
 Card (should it be
  with no background?)
Click to view the selected debtor’s transactions. For more information, see Viewing Debtor Card.
Note: This icon is enabled only after you have defined the Service order number.
 Address
Click to change the selected debtor’s address. For more information, see Maintaining Addresses in Sales Orders, Return to Merchant Authorization (RMA) Orders, Service Orders, and Sales Quotations.
Note: This icon is enabled only after you have defined the Service order number.
Service order number
Type the service order number, or press the TAB key if you want the service order number to be defaulted based on the Service order number in the Logistics section, at System/General/Settings, under Numbers settings. Alternatively, you can select the service order number to retrieve existing service orders. This is mandatory.
Note: The Service order number box cannot be edited once the service order number has been defined.
Service order date
Type or select the date the service order is created. By default, the current date is displayed.
Note: The Service order date box is enabled only after you have defined the Service order number.

Click this to define and view the details of the service order such as payment details, sales order details, analytical group details, or notes. For more information, see Service Order Conditions.
Note: This button is enabled only after you have defined the Service order number.
Your reference
Type the debtor’s reference number. By default, the service order number is displayed if the Skip order header check box at System/General settings/Settings, under Order settings in the Entry section is selected. This is mandatory.
Note: This box is enabled only after you have defined the Service order number.
Resource
Type or select the full name of the employee who is in charge of the service order. By default, the Representative defined for the ordered by debtor at the debtor maintenance (go to Finance/Accounts receivable/Maintain, select the relevant debtor, and then click Open, under the Marketing tab in the Miscellaneous section for the Advanced mode or under the Logistics tab in the General section for the Simple mode) is displayed. Otherwise, the employee who logs in to the program is displayed. This is mandatory.
Note: This box is enabled only after you have defined the Service order number.
Pricelist: Debtor
This box displays the price list created for the selected debtor who placed the service order. This box is not enabled.
Description
Type a description for the service order.
Note: This box is enabled only after you have defined the Service order number.
Warehouse
Type or select the warehouse code for the service order. By default, the warehouse code displayed is based on the Default warehouse defined at System/General settings/Settings, under Order settings in the Entry section. This is mandatory.
Note: This box is available only if you have E-Warehouse management included in your license and enabled only after you have defined the Service order number.
Shipping via
Type or select the shipping method for the service order. By default, the shipping method displayed is based on the Shipping via defined at System/General settings/Settings, under Order settings in the Entry section. However, if a Shipping via has been defined for the ordered by debtor at the debtor maintenance (go to Finance/Accounts receivable/Maintain, select the relevant debtor, and then click Open, under the Logistics tab in the General section for the Simple mode or under Financial tab in Sales order – Invoice section for the Advanced mode), the shipping method defined for the ordered by debtor will be the default. This is mandatory.
Note: This box is enabled only after you have defined the Service order number.
Pricelist: Invoice debtor
This box displays the price list created for the selected invoiced debtor. This box is not enabled.
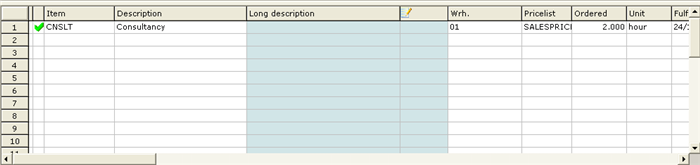
Service order lines
Type or select the item(s) ordered by the debtor, and fill in the necessary information under the respective columns when entering the order lines. A list of options appears if you press F2 in the Item column, Pricelist column, and other columns. From the list, make your selection and click Select.
Note: It is possible that not all columns in this example are displayed. You can add or remove columns as required by clicking  Columns. For more information, see Defining Service Order Columns.
Note: The Columns icon is enabled only if the service order line is clicked.
Item
Type or select the item code ordered by the debtor. Press F2 to select the item from the list of items created at Service/Items/Maintain, or press F4 to select the item from the service orders (service orders that have been realized) or items that have been realized. If you press F2, the Items screen will be displayed. For more information, see Selecting Items in Sales Orders, Return to Merchant Authorization (RMA) Orders, Service Orders, and Sales Quotations.
For more information on other columns such as Description, Pricelist, and other columns, see Defining Service Order Columns.
Service order process flow
The service order process flow displays the statuses of the service order by displaying the date the process was completed and a green check mark. The service order process flow also allows you to process the service orders by clicking on the processes. For example, if you want to authorize the service order, click Authorize.

Quoted
Click this to view the service order quotation of the selected service order. “Skip” is displayed if service order quotation is not created for the selected service order.
Ordered
Click this to view all the service orders that were placed by the selected debtor.
Authorize
Click this to change the authorization status of the selected service order. A message, “Change authorization status?” will be displayed. Click Yes to change the authorization status, or No to exit. You can also authorize the service order at Service/Entries/Authorize. For more information, see Authorizing Service Orders.
Note: This process is available only if the Service order check box at System/General/Settings, under Order settings in the Authorize section is selected.
Confirm
Click this to print the service order confirmation for the service order. The Print: Order confirmations screen will be displayed once Confirmed is clicked. For more information, see Printing Sales Order and Service Order Confirmation Slips. You can also confirm the service orders at Service/Entries/Confirm. For more information, see Overview of Service Orders to be Confirmed.
Note: Service order confirmation can be made optional at the debtor maintenance (go to Finance/Accounts receivable/Maintain, select the relevant debtor, and then click Open, under the Financial tab in the Sales order – Invoice section for the Advanced mode or under the Logistics tab in the General section for the Simple mode. The service order confirmation in the Service orders screen will follow the settings under Finance/Accounts receivable/Maintain. If the Sales order confirmation check box in the service order conditions screen (go to Service/Entries/Service orders, select the relevant service order, click Open, and then click Conditions, under the Conditions section) is selected, then service order confirmation is required. If the Sales order confirmation check box is not selected then “Skip” will be displayed under the Confirm process.
Note: If the Discount/Extra charges check box at System/General/Settings under Order settings under the Entry section is selected, Discount/Extra charge screen is displayed once the Confirm process is clicked. For more information, see Calculating Discount or Extra Charges for Sales Orders, Return to Merchant Authorization (RMA) Orders, Service Orders, and Sales Quotations.
Note: It is optional to print service order confirmation slips.
Service
Click this to print the service slip for the service order. For more information, see Printing Service Slips for Service Orders. You can also print service slips at Service/Entries/Service slips.
Note: It is optional to print service slips.
Realizations
Click this to create and process realization for the service(s) in the service order. For more information, see Creating and Processing Realization for Service Orders. Realization of service(s) can also be created and processed at Service/Entries/Realizations.
Print
Click this to print the delivery note for the service order. Invoice can also be generated and printed. For more information, see Generating Invoices for Sales Orders and Service Orders.
Invoice
Click this to view the list of all the invoices generated for the invoice debtor.
Payment
This displays the payment date of the service order.
Net
Click this to view the total Gross, Discount, Net, Cost price, Margin, and Markup % for the service order.
Taxes
Click this to view the total tax amount of the service order.
Specific
Click this to enter any discount or additional charges for the service order. For more information, see Calculating Discount or Extra Charges for Sales Orders, Return to Merchant Authorization (RMA) Orders, Service Orders, and Order Quotations.
Note: The discount or additional charges will be displayed when Close is clicked if the Discount/Extra charges check box under the Entry section is selected (at System/General/Settings, under Order settings).
Total
Click this to edit or view the service order conditions. For more information, see Service Order Conditions.
Button

Power view
Click this to view the power view report. For more information, see Power View Report.
Service call
Click this to view the details of the external service call. For more information, see Creating and Maintaining External Service Calls.
Note: This button is enabled only if a service order is created from the Activities screen (go to Service/Entries/Service calls, click New or Edit, and then click Order) when an external service call is created or edited.
Note
Click this to type a new note or view the notes that are recorded for the service order. For more information, see Creating and Maintaining Notes.
Attachment
Click this to attach a new document or to view the documents that are attached to the service order. For more information, see Overview of Attached Documents.
Fulfilled
Click this to view the realization details of the service order for the selected debtor. The services that were delivered to the debtor based on previous service orders can also be displayed. For more information, see Fulfilled Sales Orders or Service Orders.
Group
Click this to view the service order details group by Item or Fulfillment date.
MRP
MRP means “Material Resource Planning”. Click this to view the item management planning for the service order. For more information, see Overview of Material Resource Planning (MRP).
Returns
Click this to return the contract items in the service order. However, this function only initiates the return of contract items whereby sales orders, service orders, or sales quotations with a negative quantity is generated. For service orders, items must be fulfilled with a negative quantity before returns can be completed. For more information, see Returning Contract Items in Sales Orders, Service Orders, and Sales Quotations.
Note: This button is enabled only for new service orders with contract items.
Activity
Click this to view the activities created for the selected service order. For more information, see Viewing Activities in Sales Orders, Return to Merchant Authorization (RMA) Orders, Service Orders, and Sales Quotations.
Item
Click this to view or edit the details of the selected service. For more information, see Creating and Maintaining Items.
New
Click this to create a new service order.
Close
Click this to exit.
Related document
- Authorizing Service Orders
- Calculating Discount or Extra Charges for Sales Orders, Return to Merchant Authorization (RMA) Orders, Service Orders, and Sales Quotations
- Creating and Maintaining Accounts
- Creating and Maintaining External Service Calls
- Creating and Maintaining Items
- Creating and Maintaining Notes
- Creating and Processing Realizations for Service Orders
- Defining Service Order Columns
- Fulfilled Sales Orders or Service Orders
- Generating Invoices for Sales Orders and Service Orders
- Maintaining Addresses in Sales Orders, Return to Merchant Authorization (RMA) Orders, Service Orders, and Sales Quotations
- Overview of Attached Documents
- Overview of Material Resource Planning (MRP)
- Overview of Service Orders to be Confirmed
- Power View Report
- Printing Sales Order and Service Order Confirmation Slips
- Printing Service Slips for Service Orders
- Returning Contract Items in Sales Orders, Service Orders, and Sales Quotations
- Selecting Items in Sales Orders, Return to Merchant Authorization (RMA) Orders, Service Orders, and Sales Quotations
- Service Order Conditions
- Viewing Activities in Sales Orders, Return to Merchant Authorization (RMA) Orders, Service Orders, and Sales Quotations
- Viewing Debtor Card
| Main Category: |
Support Product Know How |
Document Type: |
Online help main |
| Category: |
On-line help files |
Security level: |
All - 0 |
| Sub category: |
Details |
Document ID: |
23.427.713 |
| Assortment: |
Exact Globe
|
Date: |
19-06-2012 |
| Release: |
|
Attachment: |
|
| Disclaimer |