Using Web Services with Test Application
Setting Up Exact Synergy Enterprise and Enabling Web Services
Introduction
The web services of Exact Synergy Enterprise allow you to perform "Create", "Retrieve", "Update" and "Delete" (CRUD) functions with third parties application. You can consume the web services by using the test application provided. This document provides the procedures to setup the test environment and use the web services.
Description
In order to work with the web services to perform CRUD using the test application provided, the following are required:
Enabling Web Services
Before using the web services, you need to enable it.
-
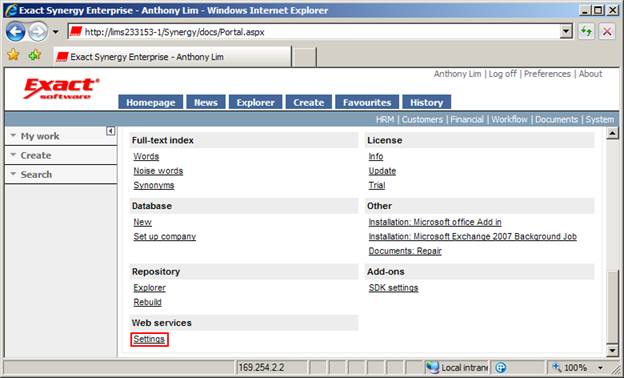
Go to System/Setup/Web services/Settings as indicated in the following screen.
-
To activate the entity services, select the required entity services check box(es). An example is shown in the following screen.
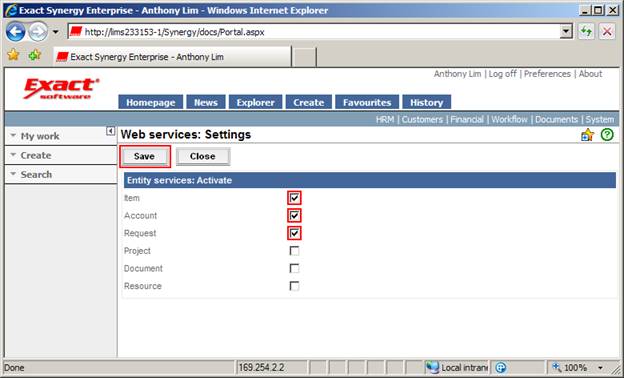
Note: For product update 241 onwards, by default the entities are activated automatically.
3. Click Save to enable the selected entity services as web services.
Note: The metadata can be retrieved irrespective of the activation of the entity services.
4. You may validate the successful hosting of the web services by going to the Exact Synergy Enterprise installation directory, where the entity services files (.svc) are available in the Services subdirectory.
Using Web Services to Perform CRUD
You are able to use the web services to perform CRUD with the test application. This is with ConectivityDemo.exe provided. However, you are required to configure the test application before using it.
-
Download the test application and unzip the files.
-
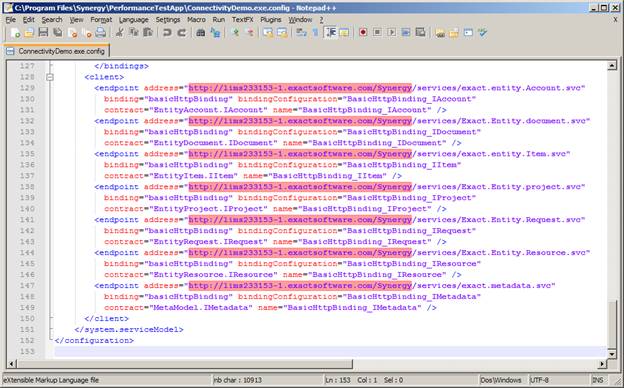
The configuration file (.config) for the test application needs to be configured first. Open the ConnectivityDemo.exe.config with any text editor.
-
Go to Configuration/ system.serviceModel /client /endpoint and change the “address” as highlighted in the following screen to the URL address of your Exact Synergy Enterprise test environment. Click Save to save the configuration file.
-
Double-click the ConnectivityDemo.exe provided, and the application as follows will be launched.
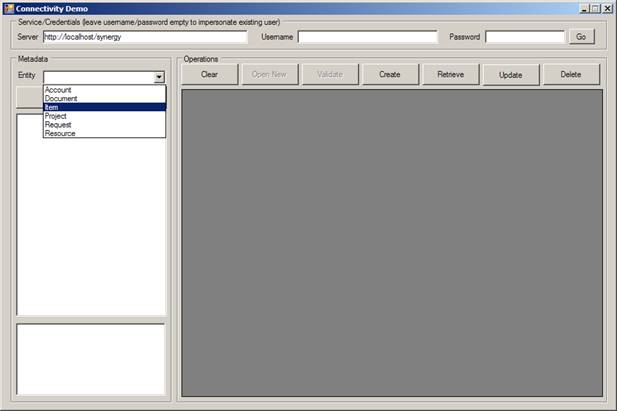
The explanation of the fields are provided in the following table:
|
Textbox |
Description |
|
Server |
Connect to the Exact Synergy Enterprise test environment |
|
Username |
Username to log in into the test environment (leave the username and password blank unless you want to log in as another user). |
|
Password |
Password to log in to the test environment. |
|
Entity |
Select an entity. Records can be created, deleted, or modified for the selected entity. |
-
Enter the URL address of the test environment at Server. Select the entity that you want to perform CRUD (create, read, update or write records/data) at Entity under the Metadata section, and click Populate Metadata. A list of information will be displayed in a tree view and grid view. For more details of the Metadata, see Exact Synergy Enterprise Web Services: Technical Reference of Business Entities.
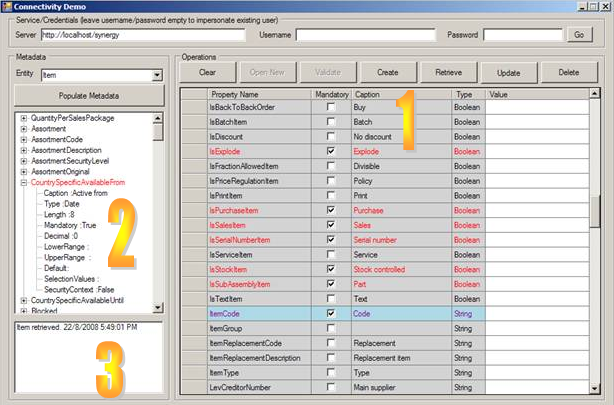
The explanation of the fields are provided in the table below:
|
Button |
Description |
|
Populate Metadata |
Populate properties of the Entity into the Tree View and Grid View. |
|
Clear |
Clear all the data’s value in the Grid View |
|
Create |
Create new record in database. |
|
Retrieve |
Retrieve record from database. |
|
Update |
Update record in database. |
|
Delete |
Delete record from database. |
|
Field |
Description |
|
Grid View (shown as 1 in the image above) |
Display the properties and values or the entity that will be created/deleted or modified. |
|
Tree View (shown as 2 in the image above) |
Display the metadata of the selected metadata, which is the "data of the data" and gives detailed information of the properties of the entity. |
|
Log View (shown as 3 in the image above) |
Display an overview of all (Create, Read, Update or Delete) actions that are executed via this application. |
|
Grid View |
Description |
|
Red Fonts |
Mandatory fields. |
|
Purple Fonts Highlighted with Cyan Background |
Primary “key” properties for each entity. |
- Once the metadata is populated, you are able to create, retrieve, modify or delete a record. The following example illustrates the creation, retrieval, modification, and deletion of an item. To create an item, select the Item entity.
Creating Item
A new item Testing001 will be created by entering the appropriate mandatory data into the fields provided in the grid view (section 1 in the image above). The mandatory data required includes Item Entity, Assortment, CountrySpecificDescription, CountrySpecificOwnerPerson, and ItemCode.
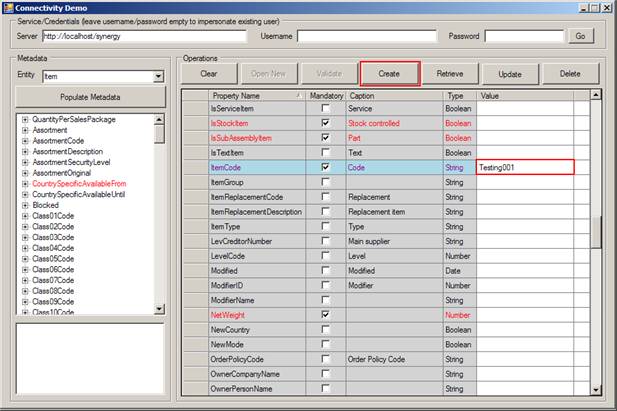
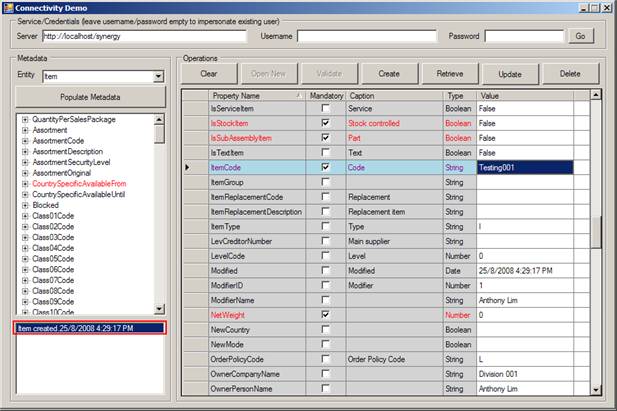
Save the new item created by clicking Save. The action to create item Testing001 will be logged and displayed in the log view as shown in the following.
Retrieving Item
Click Clear to clear the data of the previous record from the screen and type Testing001 for ItemCode.
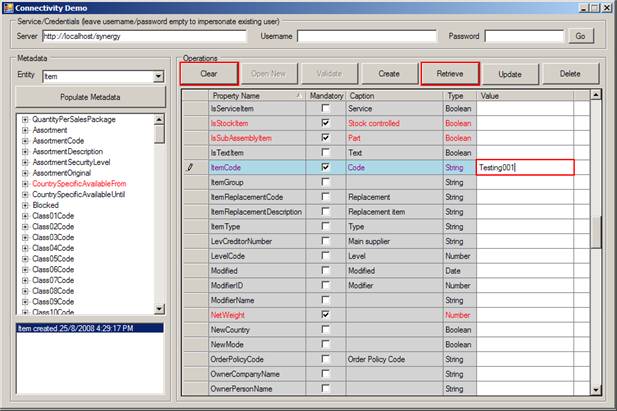
Click Retrieve to populate the record from the database. The action to retrieve the item Testing001 will be logged and displayed in the log view as shown in the following.

Updating Item
After retrieving item Testing001, you can modify the properties of the item. You are going to change the item currency for the cost price and the item description for the specific country. This can be done by changing the values of the CostPriceCurrency and CountrySpecificDescription fields respectively.

You are changing the item currency for the cost price from "EUR" to "MYR", and the item description for the specific country from "Testing" to "Testing Edited".

Click Update to save the changes. The action to update the item Testing001 will be logged and displayed in the log view as shown in the following.

Deleting Item
Retrieve item Testing001.
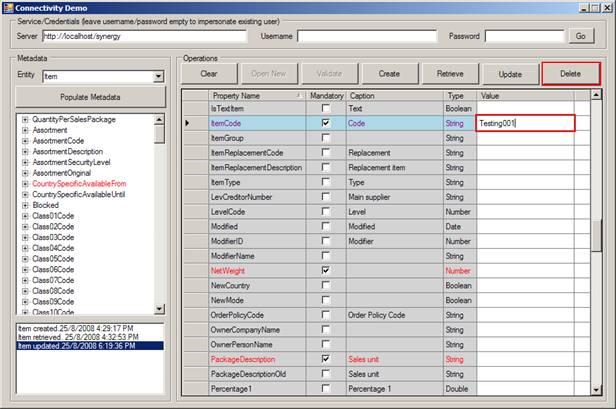
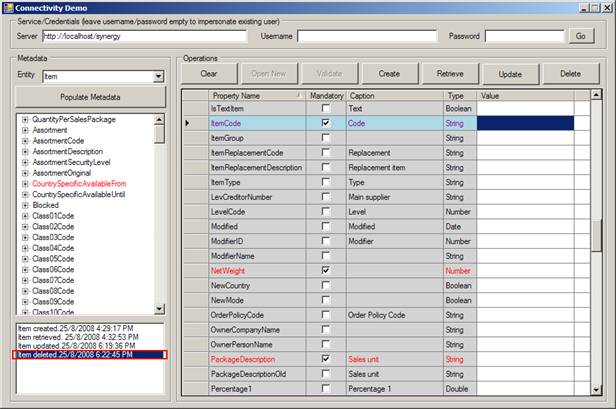
Click Delete to delete the item Testing001. The action to delete the item Testing001 will be logged and displayed in the log view as shown in the following.
| Main Category: |
Support Product Know How |
Document Type: |
Online help main |
| Category: |
On-line help files |
Security level: |
All - 0 |
| Sub category: |
General |
Document ID: |
18.050.218 |
| Assortment: |
Exact Synergy Enterprise
|
Date: |
30-06-2010 |
| Release: |
240 |
Attachment: |
|
| Disclaimer |