Introduction
This screen allows you to view your calendar as well as the calendar of another person. From here, you can also create new calendar requests and absence requests such as appointments and leave applications.
Calendar requests are requests where the Calendar option is selected in the Actions tab of the request type definition while absence requests are requests where the Absence option is selected. For more information, see Creating and Modifying Request Types - Actions Tab.
Menu path
To view your Calendar, click Calendar on the toolbar or left menu. To view the calendar of a specific person, click Person and select the person while in the calendar view. To view the person's calendar while in the personal card, open the personal card of anyone and click Calendar under the Monitor section.
Roles & rights
All users can view the Calendar page. However, for each event in the calendar, the request hyperlink, and the Account and Status information in the tooltip is displayed only if one of the following conditions is fulfilled:
- You are the creator of the request.
- You are the person linked in the request.
- You have function right 85 - Allows to create employees and the request is not private.
- You are the direct or indirect manager of the person linked in the non-private request.
- Your security level is equal to or higher than the security level of the request if the request is not a private absence request.
- You have function right 145 - View Resource card if the request is a non-private absence request.
If you are the current actor of the request and the request is not private, you can see the request hyperlink of the event but the Status and Account information will not be shown in the tooltip. If you do not fulfill any of the conditions, the occupied time block in the calendar is shown without any details or tooltip.
For more details on what you can do with function rights or levels, go to System/Setup/Security/Function rights, select the required module, and then click on the relevant ID. To find out the functions you can perform with a particular role, go to System/Setup/Security/Roles, type in the description, click Refresh and then click the required link under the Role column.
Buttons
New
Click this to create a new calendar request or absence request.
Today
Click this to display and highlight today's calendar entries in the current Working week, Week, or Month views. If you are in the Day view, clicking this will display today's calendar.
Previous
Click this to view the calendar of the previous Day, Working week, Week, or Month depending on the current view.
Next
Click this to view the calendar of the next Day, Working week, Week, or Month depending on the current view.
Person
Click this to select a person whose calendar entries you want to view. Each calendar entry of the selected person will be displayed based on the conditions explained in the Roles & rights section.
Close
Click this to exit.
Description

You can view the calendar in different detail levels by selecting the preferred view in the selection box on the top-right corner of the calendar page.
- Day - Select this to view a detailed 24-hour calendar with appointments for each half-hour block.
- Working week - Select this to view the calendar for all working days of the week showing only the work hours of each day and the appointments for each half-hour block.
- Week - Select this to view a week of the calendar including non-working days showing only the list of appointments for each day.
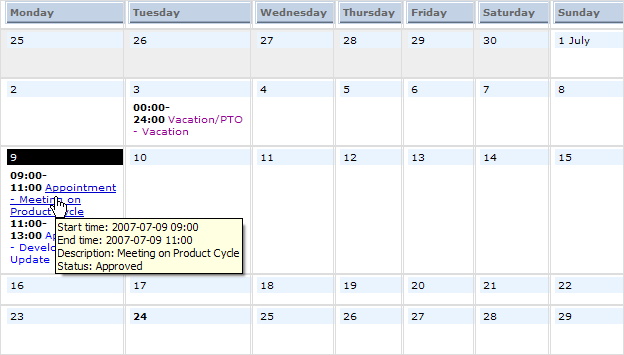
- Month - Select this to view a month of the calendar showing a list of appointments for each day.
The Working week view is based on the schedule settings affecting the person. For more information on the schedule, see Maintaining Default Corporate) Work Schedule, Listing of Work Schedules for Corporate and Divisions, and Listing of Individual Work Schedules.
To quickly view a different Day, Working week, Week, or Month, click the calendar icon next to the view selection box. The date, week number, or month being viewed is displayed next to the calendar icon.

You can view a tooltip showing the start date and time, end date and time, description, request status, and the account linked to the request by pointing your cursor on any calendar item. The Status and Account of a request is displayed in the tooltip based on the conditions explained in the Roles & rights section.
Double-click the respective half-hour block or day, depending on the current calendar view, to create a new calendar request. The start date, start time, end date, and end time fields will be filled automatically based on where you click in the calendar.
Related document