Introduction
At this page, you can modify or delete applicants. For more information on how to create applicants, see Creating Applicants. Fields that have  denote fields that need to be authorized by HR personnel if the details in the fields have been changed. The details will only be applied after the HR personnel has authorized the changes. For more information, see Overview of Fields to be Authorized.
Menu path
Go to HRM/Reports/People/Applicants, and click Show. Click the ID of the applicant under the ID column, and then click Edit.
Roles & rights
To modify applicant entries, function right 147 – Maintain resource card is required. Users with the HR and HR assistant roles have this function right.
For more details on what you can do with function rights or levels, go to System/Setup/Security/Function rights, select the required module, and then click on the relevant ID. To find out the functions you can perform with a particular role, go to System/Setup/Security/Roles, type in the description, click Refresh, and then click the required link under the Role column.
Button
Save
Click this to save the details of the applicant.
Delete
Click this to delete the applicant.
Inactive
Click this to change the status of the applicant from Active to Inactive.
Reject
Click this to reject the applicant. The status of the applicant will change from Active to Rejected.
Note: Once the applicant is rejected, this button will change to Reopen.
Reopen
Click this to change the status of the applicant from Rejected to Active.
Note: Once the applicant is active, this button will change to Reject.
Recode
Click this to recode the applicant ID of the selected applicant. For more information, see Recoding ID for People.
Close
Click this to exit.
Description
General section
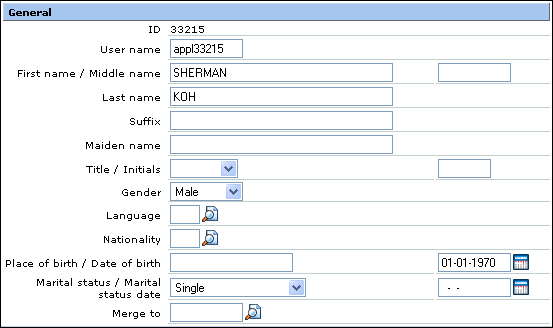
ID
This field displays the ID of the applicant. This information cannot be edited.
User name
Type the user name of the applicant. This information is mandatory.
First name / Middle name
Type the first name and the middle name of the applicant.
Last name
Type the last name of the applicant. This information is mandatory.
Suffix
Type the suffix of the applicant, if applicable. This suffix refers to the name that appears after the applicant’s last name, such as Jr. or Sn.
Maiden name
Type the maiden name of the applicant, if applicable.
Title
Select the title of the applicant. The gender of the applicant that corresponds with the title selected will automatically be filled in at Gender.
Initials
Type the initials of the applicant.
Gender
Select the gender of the applicant.
Language
Type or select the language code to specify the language of the applicant.
Nationality
Type or select the country code to specify the nationality of the applicant.
Place of birth / Date of birth
Type the place of birth and type or select the date of birth of the applicant.
Marital status / Marital status date
Select the marital status and type or select the marital status date of the applicant.
Merge to
Type or select the ID to specify or change the lead applicant that you want the information of the current applicant to merge with. For more information, see Merging Duplicate Applicants.
Personal section
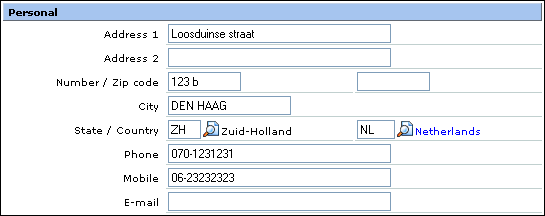
Address 1
Type the first line of the address of the applicant.
Address 2
Type the second line of the address of the applicant, if available.
Number / Zip code
Type the number and the zip code of the address of the applicant.
City
Type the city where the applicant is located.
State
Type or select the state code where the applicant is from.
Country
Type or select the country code where the applicant is from. This information is mandatory. For more information on countries, see Overview of Countries.
Phone
Type the phone number of the applicant.
Mobile
Type the mobile phone number of the applicant.
E-mail
Type the e-mail of the applicant.
Employment section
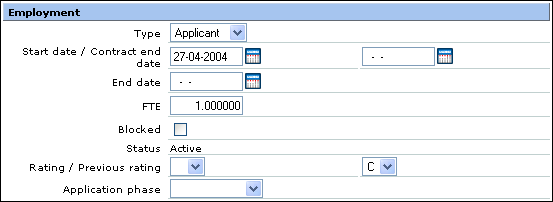
Type
Select Applicant, Contractor, Employee, Customer, Student, or Temporary to specify the type of employment for the applicant. Selecting Employee will enable the check box(es) under the Vacancies section.
Note: This is only enabled if the applicant has an Active status.
Start date
Type or select the start date of the employment of the applicant. This information is mandatory.
Contract end date
Type or select the contract end date of the employment of the applicant.
End date
Type the end date of the employment of the applicant.
FTE
Type the Full Time Equivalent (FTE) of the applicant. A person who works full-time has a FTE of 1.00 while a person who works part-time will have a pro-rated FTE. This information is mandatory.
Blocked
Select this check box to block the applicant from accessing the Exact Synergy Enterprise web portal.
Status
The status of the applicant will be displayed as Hired, Active, or Inactive. The status of the applicant is dependent on the start date of the employment of the applicant.
Rating / Previous rating
Select the rating and the previous rating of the applicant. These ratings are used as comparisons to assess the performance of the applicant.
Application phase
Select the application phase of the applicant. The options available for selection are dependent on the applicant phases defined for the selected division. For more information, see Creating and Modifying Divisions. If the application phases for the division are not defined, the applicant phases defined in the general settings will be available. For more information, see Defining HRM General Settings.
Financial section
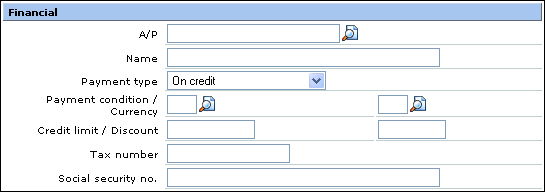
A/P
Type or select the account code to specify the creditor account of the applicant.
Name
Type the name of the applicant.
Payment type
Select the payment type of the person. This payment type refers to the method of payment for the applicant.
Payment condition / Currency
Type or select the payment condition code and the currency code of the applicant. For more information on payment conditions and currencies, see Displaying Payment Conditions and Displaying Currencies respectively.
Credit limit / Discount
Type the credit limit or the maximum amount of outstanding payment of the applicant and the default discount for the applicant.
Tax number
Type the tax number of the applicant.
Social security no.
Type the social security number of the applicant. This only applies to the applicant who comes from countries that have social security number such as the United States and Germany.
Free fields section
This section is available if you have defined the free fields and customized the layout to include the free fields. For more information on defining free fields, see Overview of Free Fields.

The fields displayed are dependent on the free fields defined for the applicant.
Picture section
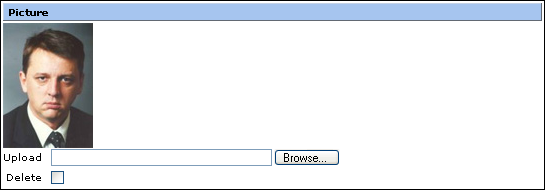
The picture that has been uploaded previously will be displayed.
Upload
Click Browse to search for the image that you want to upload or replace as the picture of the person.
Note: A Delete check box will be displayed if an image has been uploaded. Select the check box to delete the image that has been uploaded.
More information about vacancy section

Reference
Select the reference of the vacancy for the applicant. In the first drop-down list box, select the available medium. The options available are existing mediums created on the vacancy card. In the second drop-down list box, select the document that is attached to the selected medium in the first drop-down list box. For more information, see Creating and Modifying Vacancies.
Internet
Type the website address to define a particular page on the Internet.
Homepage
Type the website address to define a related homepage on the Internet.
Organization section
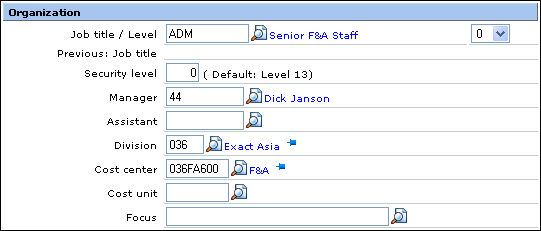
Job title
Type or select the job title code of the applicant. This information is mandatory. For more information on job titles, see Overview of Job Titles.
Level
Select the level of the applicant. This level refers to the job level of the applicant. The options that are available for selection at Level is dependent on the job title selected.
Previous: Job title
The previous job title of the applicant will be displayed.
Security level
Type the security level of the applicant. The default security level will be displayed next to this box. This information is mandatory.
Manager
Type or select the ID to specify the manager of the applicant. This information is mandatory. Click the name of the manager to view the details of the manager.
Assistant
Type or select the ID to specify the assistant of the applicant. Click the name of the assistant manager to view the details of the assistant manager.
Division
Type or select the division code that the applicant belongs to. This information is mandatory. For more information on divisions, see Overview of Divisions. Once you have selected a division, you can view the details of the division by clicking the name of the division displayed next to the box. For more information, see Viewing Division Cards.
Cost center
Type or select the cost center code that the applicant belongs to. This information is mandatory. For more information on cost centers, see Overview of Cost Centers. Once you have selected a cost center, you can view the details of the cost center by clicking the name of the cost center displayed next to the box. For more information, see Creating and Modifying Cost Centers.
Cost unit
Type or select the cost unit code that the applicant belongs to. For more information on cost units, see Overview of Cost Units.
Focus
Type or select the job group code of the applicant. This job group code refers to the job focus of the applicant. For more information on job groups, see Overview of Job Groups.
Office section
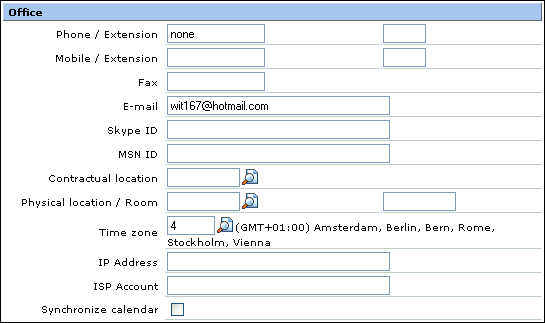
Phone / Extension
Type the phone number and its extension of the applicant.
Mobile / Extension
Type the mobile phone number and its extension of the applicant.
Fax
Type the fax number of the applicant.
E-mail
Type the e-mail of the applicant.
Skype ID
Type the Skype ID of the applicant.
MSN ID
Type the MSN ID of the applicant.
Contractual location
Type or select the location code to specify the contractual location of the applicant.
Physical location / Room
Type or select the location code to specify the physical location of the applicant. Type the room of the applicant.
Time zone
Type or select the time zone of the country where the applicant is located. This information is mandatory.
IP Address
Type the Internet Protocol (IP) address of the applicant’s personal computer.
ISP Account
Type the ISP account of the applicant.
Synchronize calendar
Select this check box to synchronize the calendar in Exact Synergy Enterprise to the Microsoft Office Outlook calendar.
Vacancies section

You can link one or more vacancies to this applicant. To view the vacancy linked to this applicant, click the description of the vacancy under the Vacancy column. Click the icon under the Action column to remove the linked vacancy from the person. If you want to link a new vacancy to this person, click Add.
To fulfill a vacancy to this applicant, select the check box next to the vacancy. The check box(es) is enabled only if you have selected Employee at Type under the Employment section. Once the check box is selected, a message “Synchronize: Vacancy – Data?” will be displayed. If you click OK, relevant information of the vacancy will be transferred to the applicant entry. Click Cancel if you do not want the vacancy information to be transferred to the applicant entry. Next, type the user name of the applicant that will fulfill the vacancy at User name under the General section, and then click Save. The applicant will now become an employee.
Note: In the advanced competency mode, the active competency profile of the selected vacancy will be automatically copied to the applicant, based on the following rules:
- If a competency profile has been defined for an applicant, the competency profile of the vacancy will not be automatically copied to the applicant.
- If a competency profile has not been defined for an applicant, the active competency profile of the vacancy is automatically copied to the applicant upon saving. All job groups in the profile, excluding the norm values, will be copied.
- If a competency profile has not been defined for both a vacancy and an applicant, upon saving the applicant, the system will prompt the message, “No competence profile found for this applicant. Create new one?” Click Yes to create the competency profile, or No if you do not wish to define any.
Note section

Type any additional note in the box provided.
Not used section
This section allows you to view other fields that are not used in any of the other sections.
Customize
Click  at the title bar to customize the information and layout of the information to be displayed in the edit mode of profile(s) of an applicant (personal level), applicants in the same division (division level), and all applicants (corporate level). For more information, see Customizing Information and Layout in Employee and Applicant Profiles.
Related document