Adding Items in Opportunities
Introduction
Introduction
Depending on the progress of the sales cycle process and the
outcome of the negotiations, you may need to add, remove, or modify the
quantity of the items in the opportunity card. This page allows you to add
items to the list of items in the opportunity card.
To add a new item to the list, click Add in the Items section of the
opportunity card. You will see a list of available items in the Items: Active
screen. Select an item or create a new item. You will see the Opportunity:
Add – Item screen. At each entry line, select an item and type the quantity
for that item. After entering the items for the opportunity, click Save.
Alternatively, click All in the Items section, and then click New.
Menu path
To add items in
opportunities, go to Customers/Report/Opportunity management/Search, define
the relevant criteria and click Show. Then click the opportunity code in
the Opportunity: Code column. In the opportunity card, click Add
in the Items section. Alternatively, click All in the Items
section, and then click New.
Roles & rights
Users with the following security rights are allowed to add
or edit the partners for opportunities. For more information, see Security
of the Opportunity.
- The user is the creator of the opportunity.
- The user is the owner of the opportunity.
- The user is the manager of the opportunity owner. The user
is currently involved in the request which is part of the sales cycle
process for the opportunity. This also includes resources which are
included in the request through the Assume, Assign, and Remark
functions. For more information, see Creating
and Modifying Requests.
Button
Save
Click this to save the item information.
Close
Click this to exit.
Description

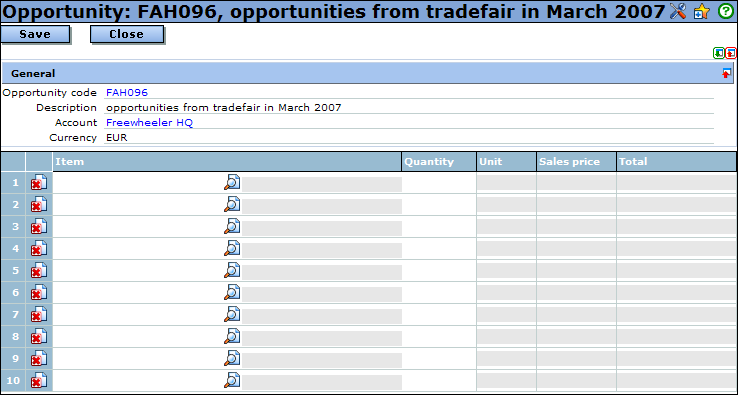
After clicking Add in the Items section of the
opportunity card, you will see the opportunity item entry screen as shown above.
It is always empty even though there are items that have been previously added
to the opportunity card.
General section
Opportunity code
This displays the opportunity card that you are entering the
items for. You cannot modify this information. Click the opportunity code to
return to the opportunity card.
Description
This displays the description of the opportunity card. You
cannot modify this information.
Account
This displays the account name linked to the opportunity
card. You cannot modify this information. Click the account name to view the
account card.
Currency
This displays the currency that is used in the opportunity
card. You cannot modify this information.
The following are the description of the columns in the
entry screen:
Item
Type the item code or select an item from the Items: Active
screen by pressing the F2 key. The description of the item will be displayed
automatically after the item code.
Quantity
Type the quantity for the item.
Unit
This displays the unit of measurement for the item. This
information is automatically displayed after you have selected the item.
Sales price
This displays the sales price of the item in the currency defined
in the opportunity card. This information is automatically displayed after you
have selected the item.
Note: You can select only the items with sales price
in the same currency as the currency of the opportunity.
Total
This displays the total amount for the item. This information
is automatically calculated based on the quantity multiplied by the sales price
of the item.
Type or select the items you want to add by pressing the F2 key
or  Search
under the Item column. After selecting an item, the item description,
unit of measurement and the sales price will automatically be displayed under
the Item, Unit and Sales price columns respectively. Then,
type the quantity for the item. Press the TAB key and the total amount will
automatically be calculated and displayed under the Total column. Click
  to remove
entries. After you have completed entering all the items and the respective
quantities, click Save.
Customize
Click  at
the title bar to customize the columns and the number of entry lines displayed
in the opportunity items entry screen. You can add or remove existing columns
based on your preferences by selecting or clearing the relevant check boxes.
Click Save to save the settings or Close to exit without saving.
Related document
| Main Category: |
Support Product Know How |
Document Type: |
Online help main |
| Category: |
On-line help files |
Security level: |
All - 0 |
| Sub category: |
Details |
Document ID: |
15.985.499 |
| Assortment: |
Exact Synergy Enterprise
|
Date: |
30-07-2008 |
| Release: |
|
Attachment: |
|
| Disclaimer |