Product update 505 | 504 | 503 (Globe+) and 424 (Globe): Malaysia e-Invoice integration to MyInvois portal available (Malaysian legislation)
In March 2023, Inland Revenue Board of Malaysia (LHDN) announced that all businesses registered in Malaysia are required to generate e-invoices for B2B, B2G, and B2C transactions.
The first phase of the mandate implementation will start from 1st August 2024 with businesses that exceed a turnover of more than 100 million ringgit. For more information, see https://www.hasil.gov.my/en/e-invoice/.
Since Exact Globe Next caters to this group of customers, we have implemented the Malaysia e-invoice functionality by generating the e-invoice in XML format and subsequently integrating it with the MyInvois API in this product update.
The scope of this functionality involves some mandatory master data setup followed by the generation of e-invoices for sales invoices and sales credit notes. You can also generate a self-billed e-invoice for submission.
As part of the update, we have made changes to the following:
-
Company data settings
- Invoice settings
- Debtor and creditor maintenance screens
- Item maintenance screen
- Tax code maintenance screen
- Setting up the output for the final print
- New fields in the address block for invoice layout
- Batch update screen
- Invoice history screen
- Printing the invoice layout with QR code
- Menu path for Self-billed invoice
- Exposing fields for XML
- Chamber of Commerce scheme ID based on private person
- TIN number and Chamber of Commerce (COC) / Business Registration Number (BRN) value in XML
- MyInvois API
- Self-billed invoice
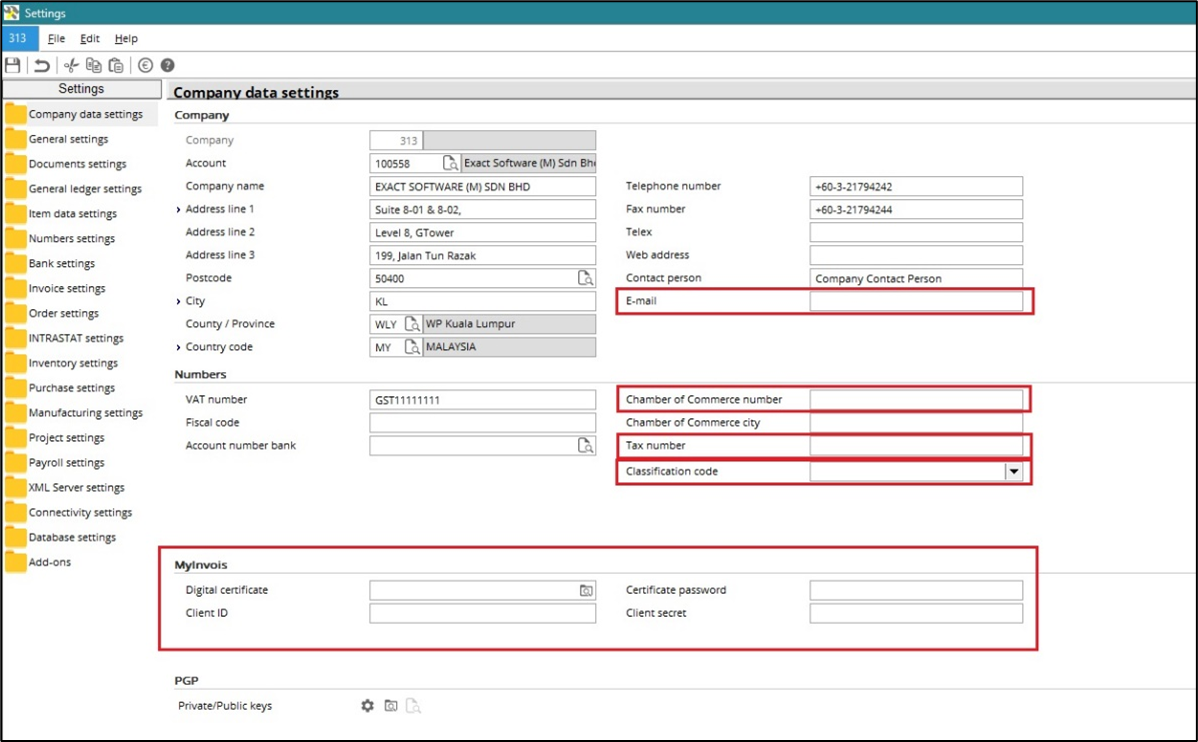
Company data settings
We have added the fields below at :
- Email
- Classification code
- Tax number
- Chamber of Commerce number (to store the BRN number)
- Digital certificate
- Certificate password
- Client ID – This is provided by LHDN based on your company information to connect to the MyInvois API
- Client secret – This is provided by LHDN to connect to the MyInvois API
Invoice settings
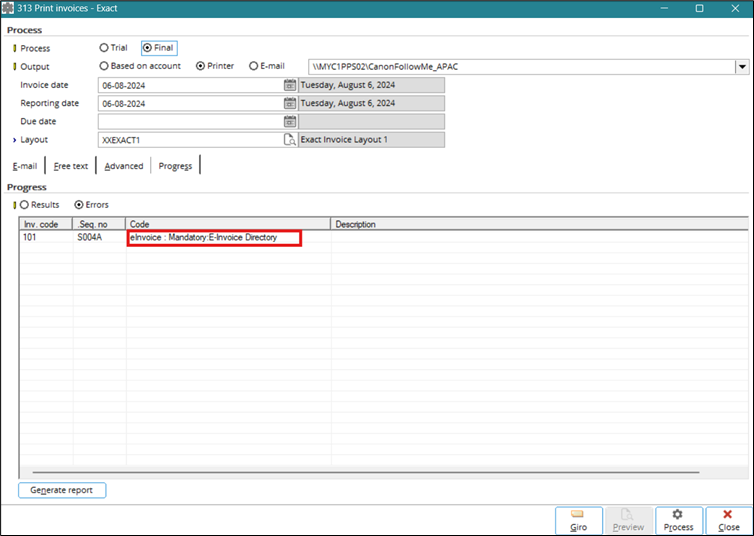
We have added the E-Invoice: Directory field under the Print section at . You can retrieve the PDF and e-invoice XML files in the export directory instead of retrieving them at or for the finalised invoices that were successfully processed if e-Invoice is selected during the final processing.
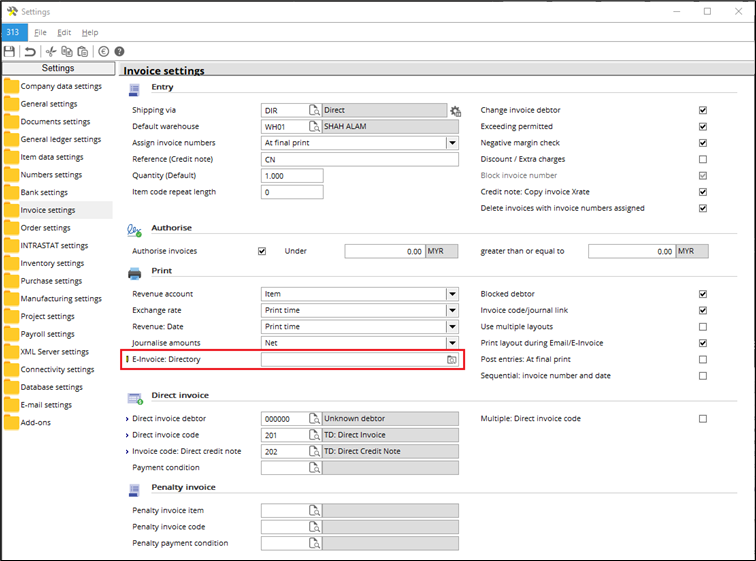
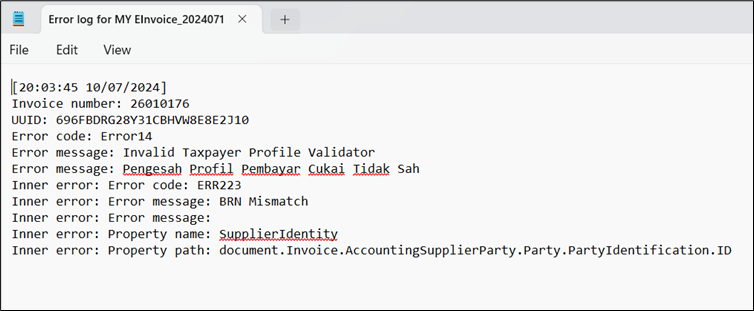
This field also lets you retrieve the error log files of the invoices that have failed during posting. However, the files are available only if you have selected the eInvoice check box in the Sales order – Invoice section under the Financial section at . Otherwise, you will have to retrieve the files at .
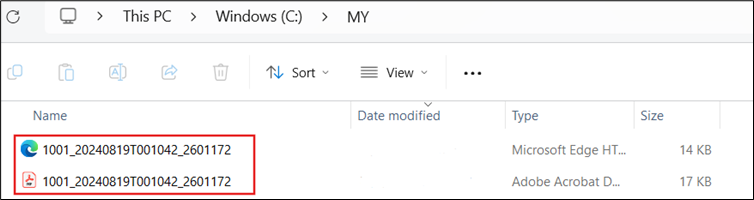
The format of the file name for the eInvoice PDF and XML output files is ”cicmpy.debcode¬_DateTime_OurRef” (for sales invoices or credit notes) or “cicmpy.crdcode_DateTime_OurRef” (for purchase invoices or purchase credit notes for self-billed). The DateTime format is using 24 hours format. The following is an example of file names:
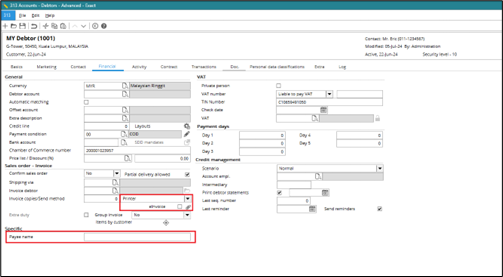
Debtor and creditor maintenance screens
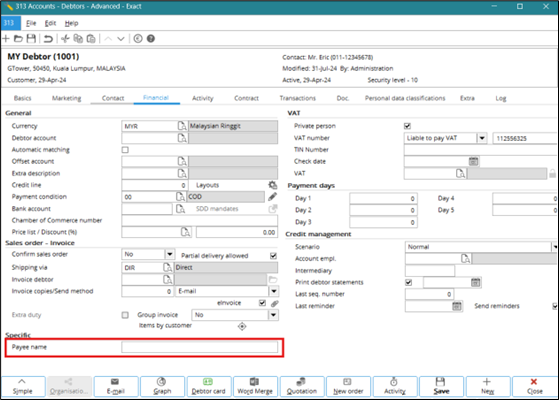
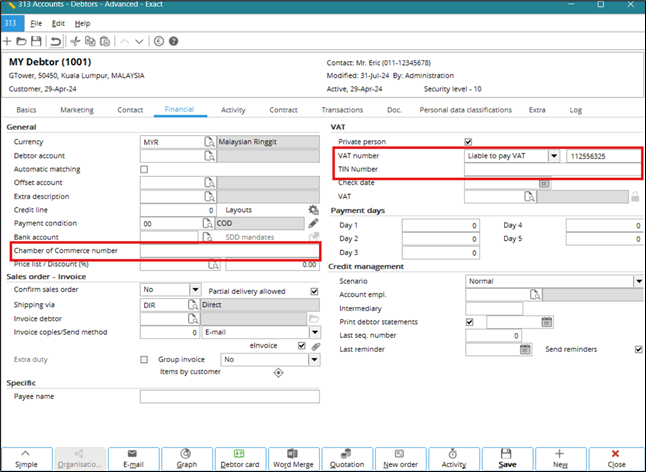
We have added the TIN Number field in the VAT section under the Financial tab at and . This is the buyer’s tax identification number assigned by LHDN.

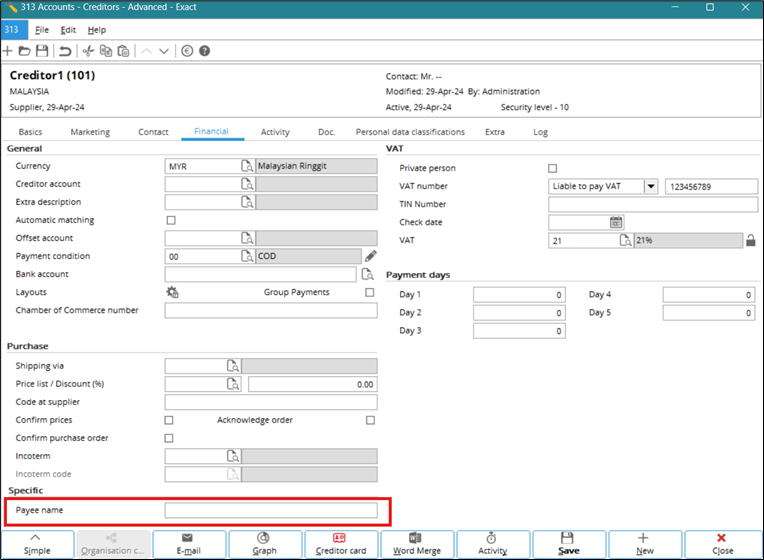
The eInvoice check box in the debtor maintenance screen is enabled. This check box will be the default during the printing and processing of invoices. The Payee name has also been extended to 80 characters for both debtor and creditor maintenance screens.
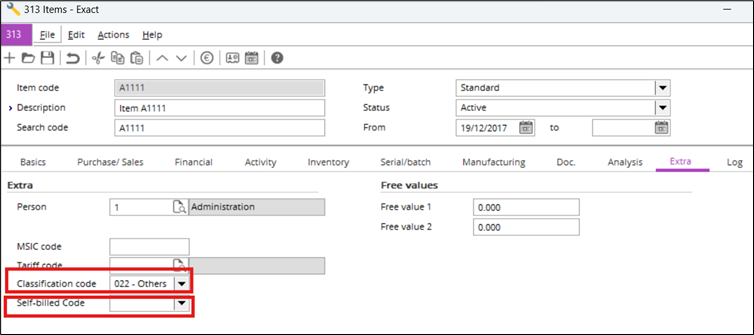
Item maintenance screen
We have added the Classification code and Self-billed Code fields in the Extra section under the Extra tab at .
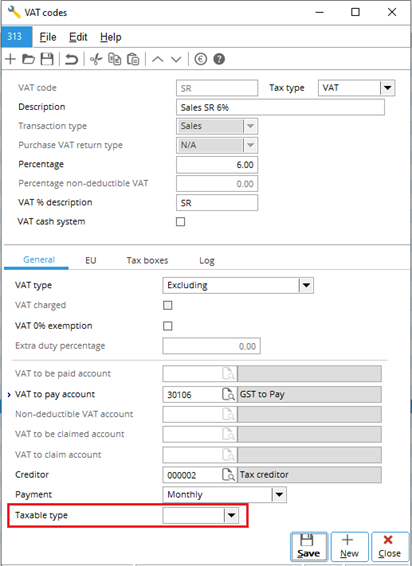
Tax code maintenance screen
We have added the Taxable type field under the General tab at .
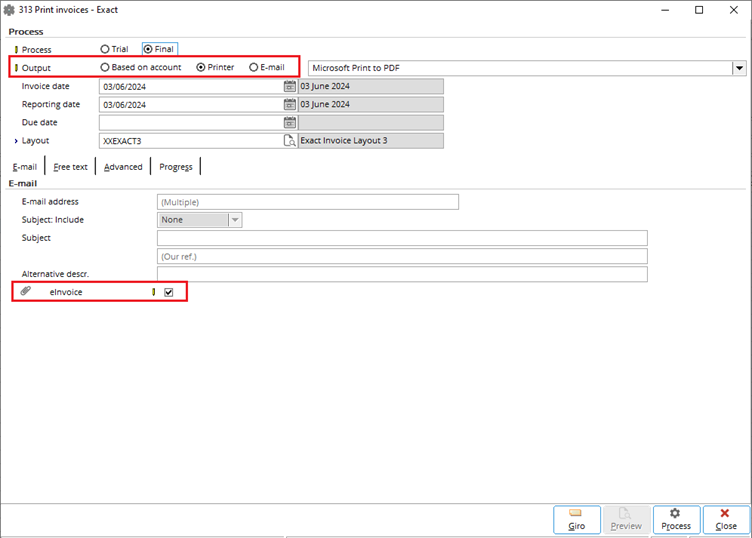
Setting up the output for the final print
If you want to process the invoices at , you can select either the Based on account, Printer, or E-mail option at Output under the Process section in the Print invoices screen. The eInvoice check box under the E-mail tab is based on the eInvoice check box setting under the Financial tab in the debtor maintenance screen.
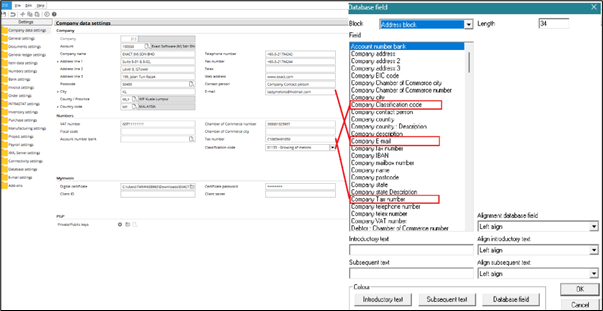
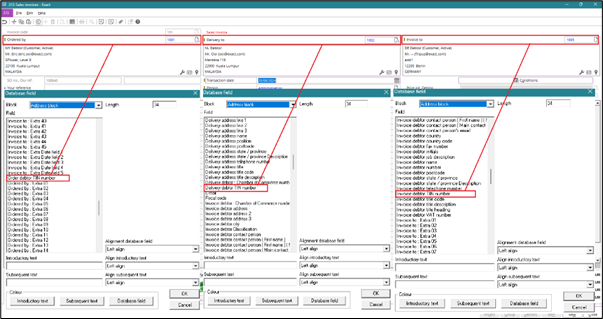
New fields in invoice layout
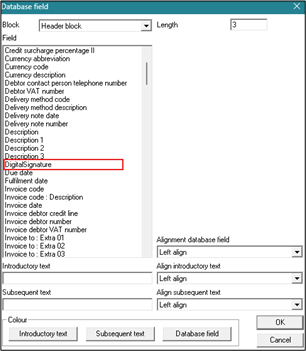
We have added the fields below at for the invoice layout’s address, text line, and header blocks:
Address block
- Company Classification code
- Company E-mail
- Company Tax number
- Invoice debtor TIN number
- Order debtor TIN number
- Delivery debtor TIN number
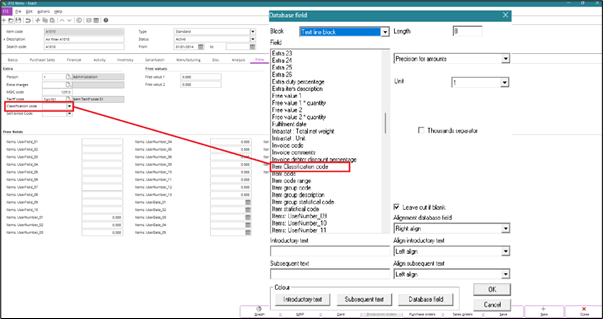
Text line block
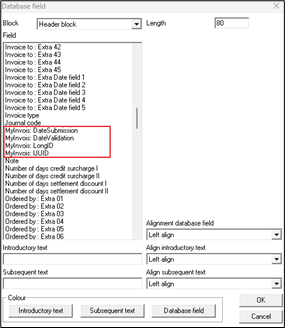
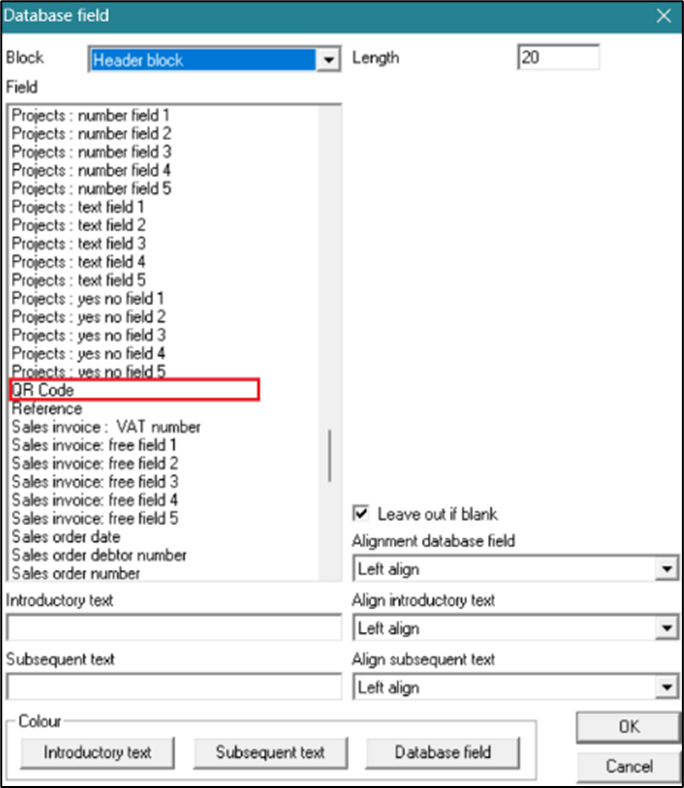
Header block
- DigitalSignature
- QR Code
- MyInvois: LongID
- MyInvois: UUID
- MyInvois: DateSubmission
- MyInvois: DateValidation
The MyInvois: DateSubmission and MyInvois: DateValidation fields retrieve the date and time. The time is in 12-hours format and displays the hour and minutes followed by AM or PM.
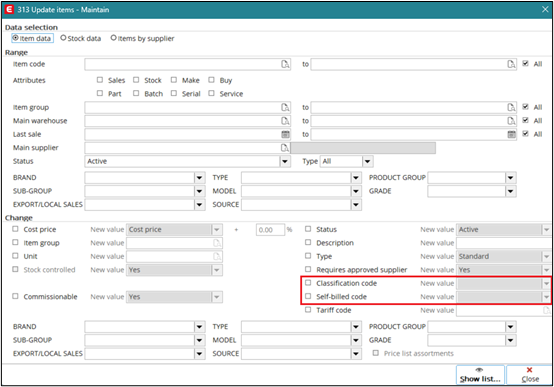
Batch update screen
We have added the Classification code and Self-billed code fields under the Change section when managing batch updates. This is found when Batch updates button is clicked at the Items overview screen (example at ). You will see the new fields when you select the Item data option under the Data selection section. This field lets you define the category of products or services billed for the commercial transaction.
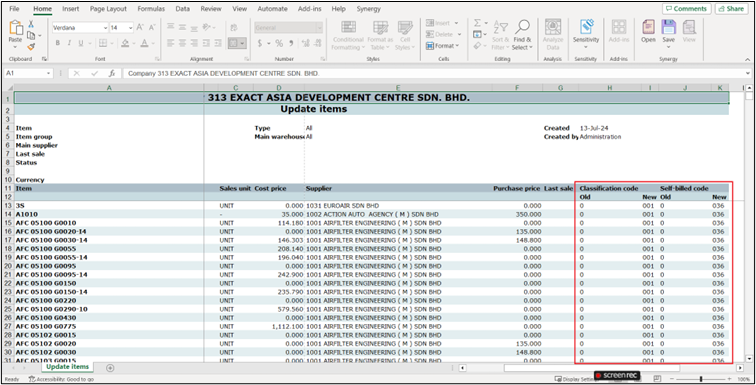
We have also added the Classification code and Self-billed code columns with old and new values in the Microsoft Excel sheet when you click Show list.
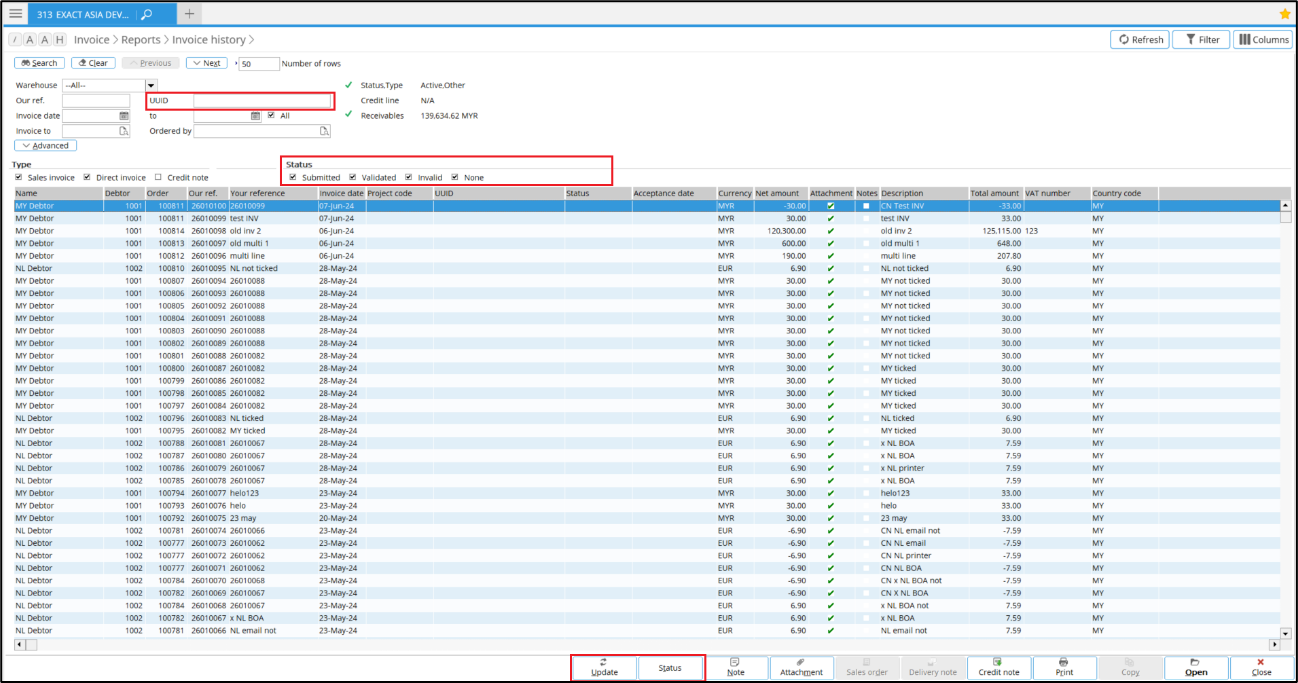
Invoice history screen
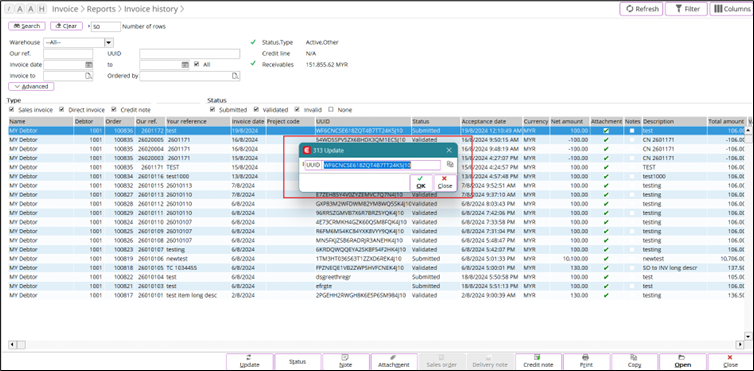
We have added the Update and Status buttons at . The Status button allows you to retrieve the status of the e-invoice from MyInvois through an API connection. You can use the Update button to perform a manual submission through the MyInvois portal and to update the returned UUID (Universal Unique Identifier) of the invoice.
We have also added the UUID field at in the Update screen when you click the Update button. You can copy the UUID value in the Update screen by clicking Copy.
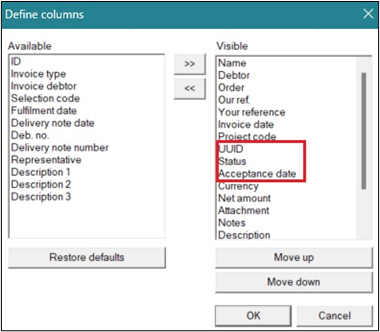
To add the UUID, Status, and Acceptance date columns in the screen, right-click on the header and click Define columns. The Acceptance date is the date the invoice was submitted when the status of the invoice is changed to “Submitted”. Once LHDN has validated the invoice and the status of the invoice changes to “Validated”, the Acceptance date will be updated to display the validated date.
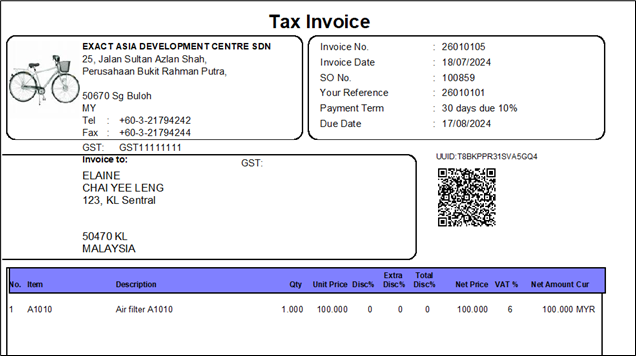
You can view the validated tax invoice by clicking Print in the Invoice history screen to get the UUID, Long ID, and QR code (if you have defined the fields in the invoice layout).
The table below displays the availability of the Update and Status buttons.
| Selected record status |
<Update> button |
<Status> button |
| Empty |
Enabled |
Enabled |
| Submitted |
Enabled |
Enabled |
| Invalid |
Enabled |
Enabled |
| Validated |
Disabled |
Disabled |
| Multiple submitted |
Disabled |
Enabled |
| Multiple invalid |
Disabled |
Enabled |
| Multiple validated |
Disabled |
Disabled |
| Submitted and Invalid |
Disabled |
Enabled |
| Submitted and Validated |
Disabled |
Disabled |
| Invalid and Validated |
Disabled |
Disabled |
| Empty and (Submitted or Invalid) |
Disabled |
Enabled |
| Empty and (Submitted or Invalid) and Validated |
Disabled |
Disabled |
We have also added the UUID and Status filters in the Invoice history screen.
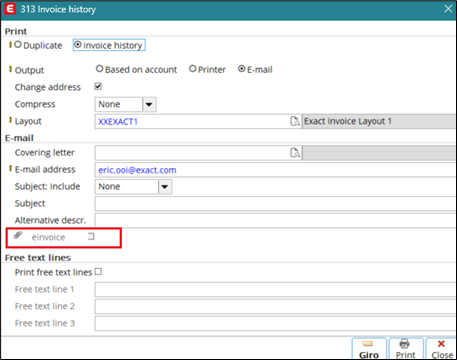
The eInvoice check box under the Email section in the print invoice history screen is disabled.
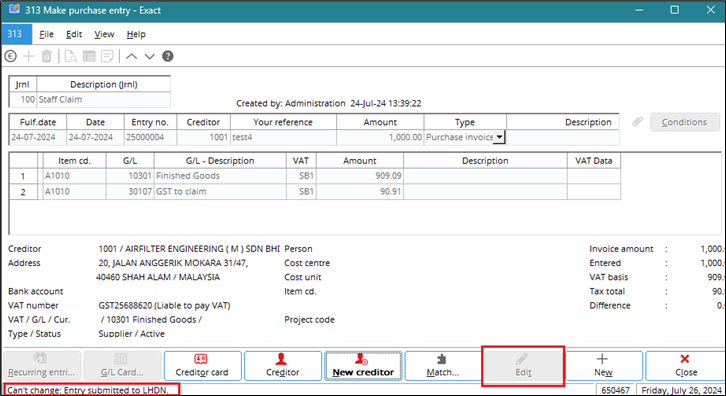
Self-billed
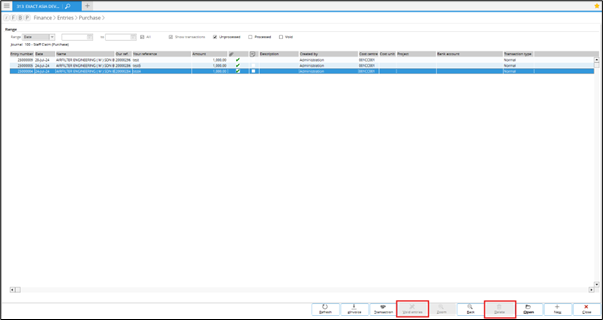
If the self-billed purchase entry has “Open” or “Invalid” as its status, the Edit, Delete, and Void entries buttons will be enabled at Finance > Entries > Purchase and . This will allow the purchase entry to still be edited while having these statuses. The Edit button will always be disabled for purchase entries with a “Submitted” or “Validated” status.
The table below is shown when the Delete and Void entries buttons in () and () are enabled if the self-billed purchase entry or credit note has the “Submitted” or “Validated” status.
| Selected record level |
Delete button at /FBP & FBG |
<Void entries> in /FBP & /FBG |
| Journal-level selection |
Enabled but error will be displayed when click |
Enabled but error will be displayed when click |
| Entry-level selection |
Disabled |
Disabled |
When you define the purchase credit note with the self-billed VAT code, the VAT Data field will be changed to UUID for you to define the original purchase invoice UUID. This will allow you to keep track of the purchase credit note as self-billed. You can press the F2 or F5 button to manually fill in the UUID field.

Menu path for Self-billed invoice
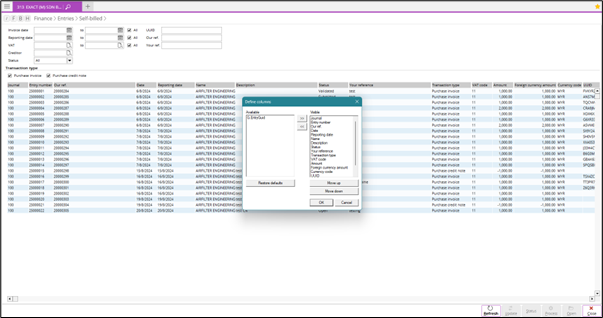
We have added the menu path. The Finance > Entries > Self-billed screen lets you filter the invoice list and view the API information such as UUID, acceptance date, and others.
The Process button is enabled only if the selected record is:
- Open
- Invalid
- Multiple open
- Multiple invalid
- Open and invalid
The Status button is only enabled if the selected record is:
- Submitted
- Multiple submitted
The possible status of the invoices are as follows:
- Open – The invoice has not been processed and submitted to LHDN.
- Submitted – The entry has been submitted to LHDN through API after the first validation but API has not returned the status yet.
- Invalid – The invoice has been submitted to LHDN through API after the first and second validation but API returned an invalid status.
- Validated – The entry has been processed and submitted to MyInvois API after the first and second validation, and API returned a valid status.
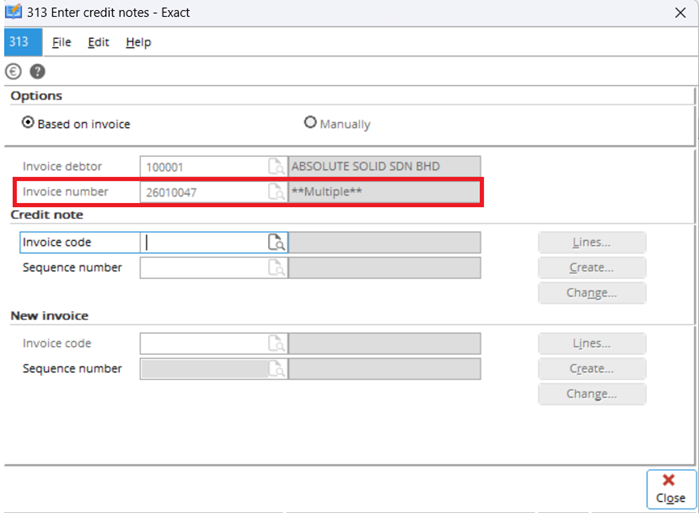
Select multiple invoices in Credit note screen
You can select multiple invoices in the Enter credit notes screen at . In this screen, select the Invoice debtor and list of invoices that belong to the debtor. You can select multiple invoices for a credit note only if the same debtor and invoice currency are selected.
We have also added the RefUUID and RefInvoice columns in the Invoice history screen at . These two columns store the reference numbers for UUID and invoices separated with a “,”. If available, the RefUUID and RefInvoice columns will also list the invoices related to a credit note.

E-invoice XML changes for UBL2.1 format
XML changes for tax exemption
The E – Tax Exemption option is displayed at under the General tab if VAT is selected at Taxable type field.

If you select “E” for the taxable type, the <TaxExemptionReason> tag will be included in the XML. The system will firstly insert the “VAT % description” in the <TaxExemptionReason> tag otherwise the tag will contain “Tax Exemption”. If you did not define “E” for the taxable type, the system will take the value from the VAT 0% exemption check box to determine the invoice and credit note XML tag value.
Fields exposed for custom XSL
Sales
You can expose Free Field 1 to 5 (for example, <cbc:FreeField1>) by manually editing “MYUBLExport.xsl” in the “<Software>\docs” folder under the Invoice header section.
You can expose Free Field 1 to 5 (for example, <cbc:FreeField1>) by manually editing “MYUBLExport.xsl” in the “<Software>\docs” folder under the Invoice header section.
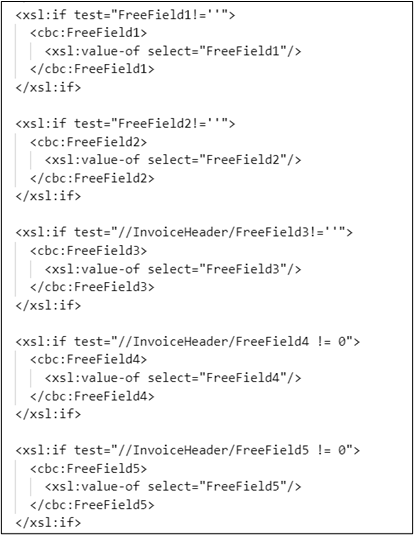
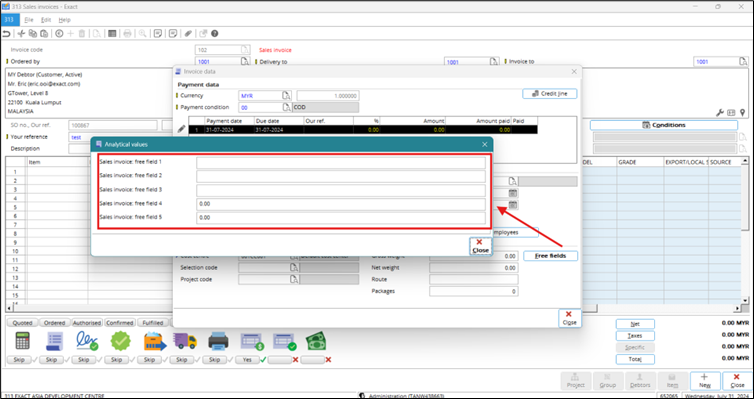
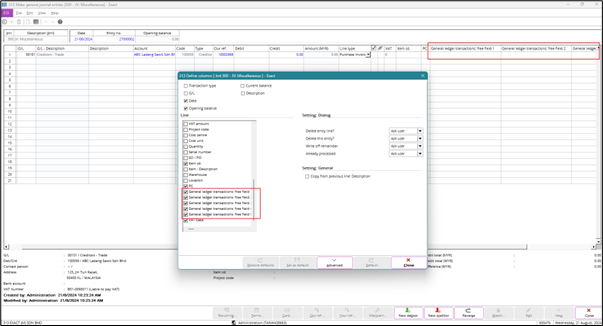
The Free field 1 to 5 values are retrieved from the Invoice data screen when you click Condition in the Invoice entry screen at .
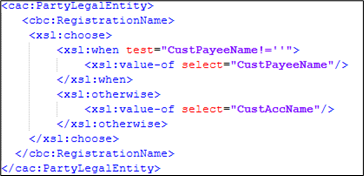
You will see the free fields attribute in the <cac: AdditionalDocumentReference> block under the invoice header in the generated XML. You can also define the attributes for the payee name of the debtor <cac:CustPayeeName> and delivery debtor <cac:DeliveryDebtorPayeeName> under the Debtor and Delivery Info sections by manually editing “MYUBLExport .xsl” at “<Software>\docs”.
The image below displays the <CustPayeeName> attribute in the XSL file.
The image below displays the <DeliveryDebtorPayeeName> attribute in the XSL file.
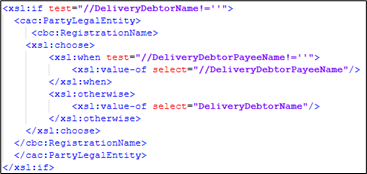
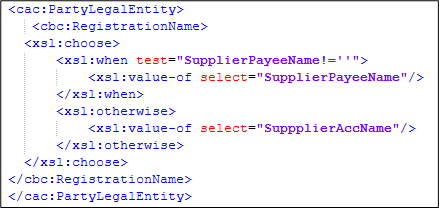
When you generate the XML file, the value of the <cbc:RegistrationName> tag will be the <CustPayeeName> attribute that you set in xsl if the Payee name field is not blank. Otherwise, the system will use <CustAccName> (registration name) as the default. This also applies with <SupplierPayeeName>. The payee’s name is retrieved from Payee name in the debtor card under the Specific section in the Financial tab.
Purchase (self-billed)
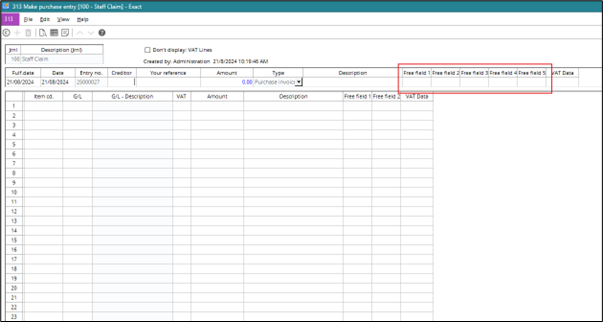
To customise “MYUBLExport.xsl” in the “<Software>\docs” folder for purchase (self-billed) using Free field 1 to 5 in the purchase journal, you can use the same steps as above for sales. However, the naming, such as <cbc:PurchaseFreeField1>, will not be included. The free field 1 to 5 values are retrieved from the header in the purchase entry screen at .
You can define the <cbc:SupplierPayeeName> attribute of the payee name for the creditor under the Creditor section by manually updating “MYUBLExport.xsl” in the “<Software>\docs” folder.
The supplier’s payee name is retrieved at Payee name under the Specific section in the creditor card under the Financial tab.
Note: The attribute defined in the xsl file must be the same as the one used in Payee name field above. If the attribute is defined in another place in the xsl file, you have to define the attribute with a path. For example, <xsl:if test=”//InvoiceHeader/FreeField3!=’’”>.
Sales and purchase (self-billed)
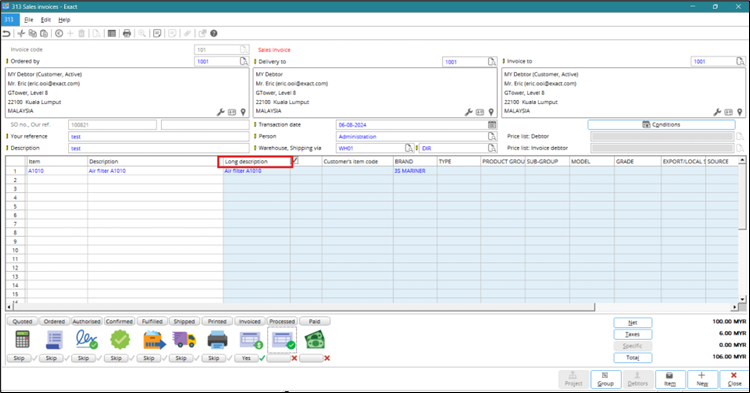
The <cbc:Description> item description tag in the Invoice line section in the XML file contains the item description (ItemCode). You can update the <cbc:Description> item description tag value by updating the code in the “MYUBLExport.xsl” file.

You must select the Text check box and define the Text field under the Attributes section in the item maintenance screen if you want to use the item long description in the xsl file instead of using the item code.
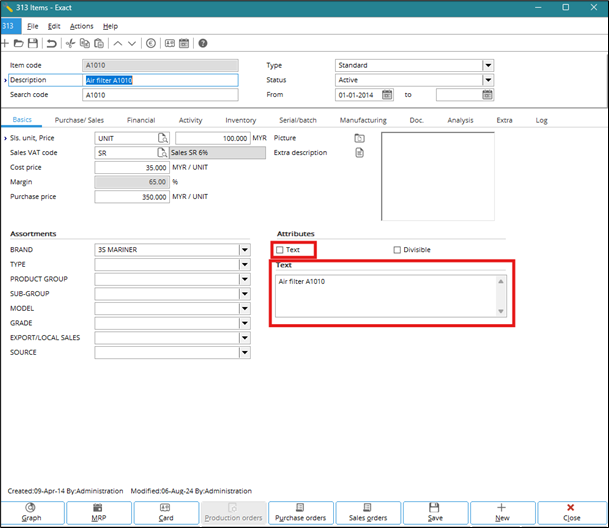
Once you have selected the Text check box in the item maintenance screen, you can define the item long description under the Long description column in the invoice entry screen.
The long description for the self-billed invoices are only retrieved from the Text field in the item maintenance.
Note: The attribute defined in the xsl file must be the same as the one used in the Long description column above. If the attribute is defined in another place in the xsl file, you have to define the attribute with a path. For example, <xsl:if test=”//InvoiceHeader/FreeField3!=’’”>.
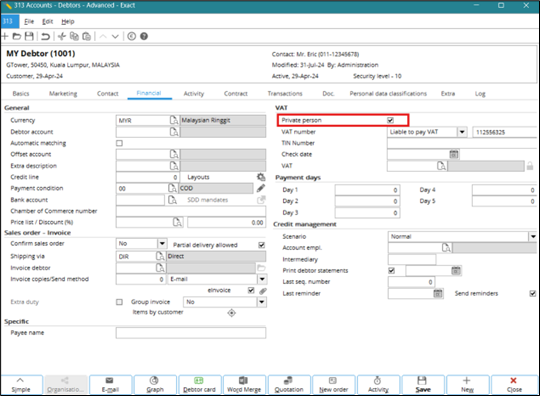
Chamber of Commerce (COC) scheme ID based on private person
You can select the Private person check box under the Financial tab at . If the check box is selected, the value that you have defined in the Chamber of Commerce number (COC) field will be considered as the debtor’s NRIC or passport when you generate the XML tag. If the first character is an alphabet, the COC scheme ID in XML will contain the debtor’s passport whereas if the first character is a number the COC scheme ID in XML will contain the debtor’s NRIC.
TIN number and COC value in XML
You can define the TIN number, COC value, and VAT number for the debtor’s company or individual under the Financial tab at . If you did not define the debtor’s company or individual TIN number and/or COC value in the debtor maintenance screen, the default TIN number and COC value generated in the XML will be as follows:
- If the local debtor TIN is not defined, it will be defaulted to “EI00000000010” for individual and “NA” company.
- If the foreign debtor TIN is not defined, it will be defaulted to “EI00000000020”.
- If the foreign supplier TIN is not defined, it will be defaulted to “EI00000000030”.
- If the local individual buyer and/or individual supplier (self-billed invoice) provides the TIN without the IC number, the NRIC will be defaulted to “000000000000”.
API integration in Exact Globe+
The invoice process flow is applicable for sales invoices and sales credit notes at or .
The documents below will be created depending on the status of the final process at and :
First validation
If the E-Invoice: directory field in the Invoice settings is blank or the XML validation has failed, the XML, PDF or HTML, and log files in the external directory will not be created. The error message will be displayed during the final posting and the invoice will remain as an open entry.
Second validation
Invoice final process with "Submitted" or "Validated" statuses
If you have selected the eInvoice check box and E-mail or Based on Account option (debtor settings is “Email”) at Output for the final process of the invoice, the following will occur:
- If the Client ID and Client secret fields are blank at , the following occurs:
- The invoice will not be automatically submitted to the MyInvois portal through API. The UUID, status, and acceptance date will be blank at after the final posting.
- The XML and PDF files will be generated in the export directory and (invoice layout without UUID, Long ID and QR code), and email will not be sent.
- If the Client ID and Client secret are not blank at , the following occurs:
- The invoice will be automatically submitted to the MyInvois portal through API. The UUID, status, and acceptance date will be displayed at after the final posting.
- The PDF and HTML files will be generated to display the QR code, Long ID, and UUID in the invoice layout in the export directory and at depending on the document settings. If the setting is PDF, the PDF file will be re-generated to replace the original PDF file in the export directory and at . If the setting is HTML, the PDF file will be re-generated to replace the original PDF file in the export directory. A new PDF file will also be generated at and the re-generated HTML file will replace the original HTML file at .
- An email will be sent if the invoice returned from LHDN API contains the “Submitted” or “Validated” status during the final invoice processing.
- The email attachment will only contain the PDF (invoice layout with UUID, Long ID, and QR code) and the XML will be attached to the email. The HTML file will not be attached even if you have selected the HTML setting.
Invoice final process with Invalid status
In this scenario, no layout or XML will be generated in the external directory and at . The invoice will not go through the final process and it will remain as an open entry. However, you can still edit the invoice and perform the final process. When this happens, the invalid invoice will be deleted and the new invoice will be available for final processing. The log file will be created in the external directory and if the error occurs again during the subsequent posting for the same date, the error will be updated in the existing log file.
Self-billed invoice
MyInvois also supports self-billed invoices and it is used to submit the issued invoices to the tax authority. The self-billed invoices are applicable for purchase invoices and purchase credit notes. You can view the self-billed invoices at if the purchase entry or credit note is created using the self-billed VAT code at .
To prevent the self-billed process from failing, do the following:
- Make sure the item code is defined in the purchase entry line.
- Make sure that the item classification and self-billed code for the item are defined in the item maintenance card under the Extra tab.
- You have to use the tax code that has the VAT self-billed check box enabled and Taxable type is defined in the tax maintenance screen under the General section.
The XML file of the self-billed invoice will be generated and stored in the external directory and at if the first stage validation of the self-billed invoice with the Submitted, Invalid, or Validated status is successful.
After the second stage validation, you can do the following:
- In the case of an Invalid self-billed invoice:
- You can update the purchase entry and process the entry again.
- The system will generate a new XML file and store it in the external directory.
- The filename at will be replaced with the latest XML for the same entry.
- In the case of a Validated self-billed invoice:
- The system will process the final entry. However, if the final process fails, Unprocessed will be displayed at. You can go to to process the entry again.
Note: Do not use the existing VAT codes with the VAT Self-billed check box enabled. All the existing transactions that were previously using this VAT code will be displayed at if the VAT Self-billed check box is enabled.
| Main Category: |
Attachments & notes |
Document Type: |
Release notes detail |
| Category: |
|
Security level: |
All - 0 |
| Sub category: |
|
Document ID: |
32.064.391 |
| Assortment: |
Exact Globe+
|
Date: |
04-11-2024 |
| Release: |
|
Attachment: |
|
| Disclaimer |