E-WMS: Installation and configuration of Microsoft IIS on Windows 7 or Windows 8
WMS documentation
Introduction
This document describes how to install and configure Microsoft IIS for
E-WMS ASP on Windows 8 or Windows 7, from release 411.
For IIS installation and configuration in release 410 and earlier, please see
this document.
Description
Installation of Microsoft IIS
- Go to [Start/Control Panel/Programs and
Features]
- Click in the left panel on "Turn Windows features on or off”
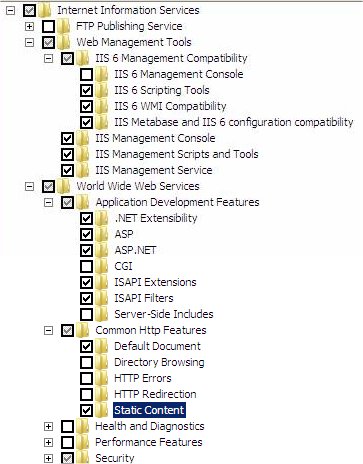
- Expand “Internet Information Services” and enable these options:
- Web Management Tools, IIS6 Management Compatibility, check “II6
Scripting tools”
- Web Management Tools, IIS Management console
- Web Management Tools, IIS Management Scripts and Tools
- Web Management Tools, IIS Management Service
- At 'World Wide Web Services/ Application Development Features', enable :
- .NET Extensibility
- ASP
- ASP.NET
- At 'World Wide Web Services/Common Http features', enable:
- Click “OK” and let Windows update. This may take some time.
Configuration of IIS
- Go to Start/Control Panel/Administrative Tools and start “Internet
Information Services (IIS) Manager”
- In the left pane, expand server name, “Sites”, “Default web site”
- Right-click on “Default web site” and choose “Add Application …”
(not: virtual directory)

- Alias = the name where the WMS site would be available, for instance
"WMS" = will create web address http://servername/wms
- Physical path = The path where the IIS files for WMS ASP are located,
for example C:\E-WMS\IIS
(note: these ASP files have to be extracted from the Exact.WMS.Web.zip file
which is downloaded with the Globe product update)
- Click 'OK'.
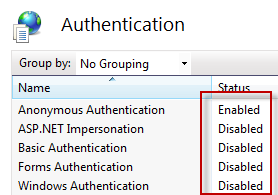
- Click on your WMS virtual directory in the
left pane and double-click “Authentication” in the options screen.
Make sure that 'Anonymous Authentication' is enabled and the other methods
are disabled.

- Optionally: you can configure how decimal separators and dates are shown
and entered on the scanner.
Click on your WMS virtual directory in the left pane and now
double-click ".Net Globalization" in the upper part of the middle pane. In this screen you can determine what regional settings to apply
in WMSclient on the 'hand terminal', by setting the options 'Culture' and 'UI Culture'. This is especially important for input of decimals and dates on the hand terminal.
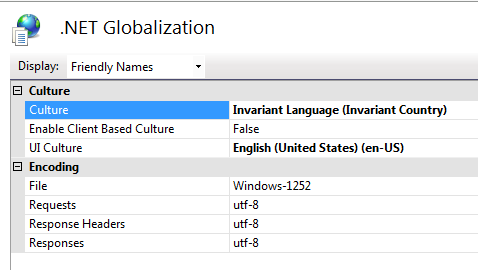
Set these options to "English (United States) (en-us)" if you want to use
the 'dot' as decimal sign. Set these options to "Dutch (Netherlands) (nl-nl)"
if you want use the 'comma' as decimal sign. Keep in mind that on a hand
terminal the 'dot'
is often a separate key on the keyboard. When entering dates on the hand
terminal, the format YYYY-MM-DD (2010-12-31) will always work, regardless of
regional settings.
English Us = enter decimals as 5.5 on the mobile device
Dutch (NL) = enter decimals as 5,5 on the mobile device
Application Pool
In IIS, usage of non-default .NET usage or for instance usage
of a 32bit application, is managed through IIS
'Application pools'.
Since release 411, E-WMS uses .NET 4, is a 64bit application and uses
'integrated pipelines'.
These are the default settings for the IIS 'DefaultAppPool' which is default
linked to new web applications.
Therefore, creating
and linking a specific application pool for E-WMS is optional from
release 411.
Application pools are also used to isolate web applications. If you are using
multiple web applications on this IIS server, it is advised to create a separate
application pool for each web application.
Create a new Application Pool
In the IIS manager, expand the server name. Right click on "Application Pools" and select Add Application Pool.
Name the Application Pool, for instance WMS.
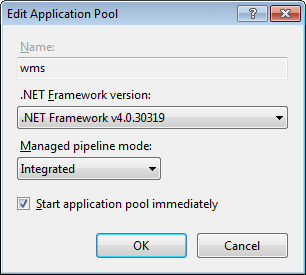
From release 411, E-WMS requires following configuration:
-
.NET CLR Version v.4.0.xxxxx
-
Managed pipeline mode = Integrated
Press OK to save this new Application Pool.
Link Application Pool to E-WMS web site
When a specific Application Pool was configured for E-WMS, it still has to be
linked to the E-WMS web site.
Start IIS manager, expand the server name, expand "Sites", expand "Default web site". Click on the E-WMS web site and choose Basic settings in the far right panel. Click on Select and choose
the specific Application Pool which was created in the previous step:

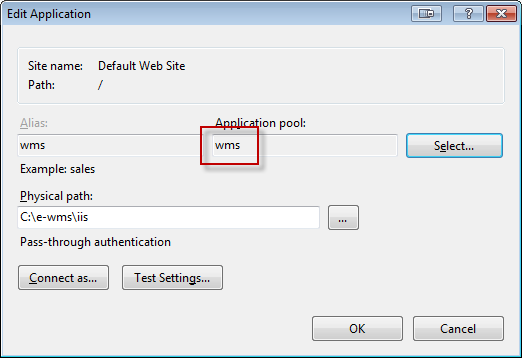
Press OK to save this configuration.
Related documents
| Main Category: |
Support Product Know How |
Document Type: |
Support - On-line help |
| Category: |
On-line help files |
Security level: |
All - 0 |
| Sub category: |
Details |
Document ID: |
19.520.239 |
| Assortment: |
E-WMS
|
Date: |
12-05-2016 |
| Release: |
|
Attachment: |
|
| Disclaimer |