Getting started with Microsoft Entra ID in Exact Globe+
Introduction
If Exact Globe+ is configured for the federated identity
environment, the federated identity services must also be configured to support
the federated identity authentication, and to perform the federated identity
authentication using the configured federated identity provider details.
Scope
This document describes the following:
- Configuring Microsoft Entra ID applications
- Overview of Exact
Globe+ with federated identity configuration
- Retrieving
federated identity configuration details
- Configuring
the federated identity configuration files for Exact Globe+
- Additional information
Configuring Microsoft Entra ID applications
When Exact Globe+ needs to be configured for federated identity, several values need to be
provided to successfully manage this. To define the configuration file
correctly, you need to configure your Microsoft Entra ID using the Azure portal.
After logging in
to your Azure portal, go to the active directory page and select the active
directory you wish to use.
To
configure the Microsoft Entra ID applications, do the following:
Creating
a Web application
- Log
in to your Microsoft Entra ID portal.
- Go
to Microsoft Entra ID.
- Click
the active directory that will be used for Exact’s products.
- Click App registrations.
- Select All Applications.
- All
the current Microsoft Entra ID application registrations will be
displayed.
- Click New registration.
- On
the Register an application page, do the following:
- Type
a name for the application at Name.
- Select
account type Accounts in this
organizational directory only (domain name).
- Select
type Web as redirect URL.
- Type
the Redirect URI at Redirect
URI. This is the Exact Synergy
Enterprise URL with a trailing slash, for example, https://domain/Synergy/.
- Click Register.
- Click
Authentication
- In
the advanced settings section, enable mobile and desktop flows.
- Click Expose an API.
- Click Add a Scope.
- Click Save and continue to
set the Application ID URI. It is automatically generated, but you should change
this to your Exact Synergy Enterprise URL. This value is case-sensitive;
you should use the value exactly as it is in your portal, including any
symbols. You are advised to always use lowercase to
avoid a mismatch of the values. For more information, see How-to: Retrieving information for Microsoft Entra ID.
- Define
the scope properties:
- Scope
name: user_impersonation
- Who
can consent: Admins only
- Admin
consent display name: Access
Exact Synergy Enterprise
- Admin
consent description: Access
Exact Synergy Enterprise
- User
consent display name: Access
Exact Synergy Enterprise
- User
consent description: Access
Exact Synergy Enterprise
- State: Enabled
- Click Add Scope.
- Click Save.
Creating a Public client application
- Log
in to your Microsoft Entra ID portal.
- Go
to Microsoft Entra ID.
- Click
the active directory that will be used for Exact’s products.
- Click App registrations.
- Select All Applications.
- All
the current Microsoft Entra ID application registrations will be
displayed.
- Click New registration.
- On
the Register an application page, do the following:
- Type
a name for the application at Name.
- Select
account type Accounts in this
organizational directory only (domain name).
- Select
type Public client (mobile &
desktop) as redirect URL
- Type
the Redirect URI at Redirect
URI. This is the Exact Synergy
Enterprise URL with a trailing slash, for example, https://domain/Synergy/.
- Click Register.
- Click
Authentication. Under the Mobile and desktop applications section, select a check box and type the URL "urn:ietf:wg:oauth:2.0:oob".
- In
the advanced settings section, enable mobile and desktop flows.
- Click API permissions.
- Click Add a permission.
- On
the Request API permissions page, click APIs
my organization uses.
- Search
for the application you created of type Web.
- At What type of permissions does your application require?, select Delegated
permissions.
- Under
the PERMISSION section, select user_impersonation.
- Click Add permissions.
- Click
Grand admin consent for
<domain name>.
Configuring Exact Globe+
To use federated identity with Exact Globe+, the following
configuration details must be made available in Exact Globe+:
- SAML Issuer Name
- Client ID
- Resource
- Allowed Audience
- Metadata
- Thumbprint
- Authority
The configuration details stated must be entered in the Federated
Identity Configurator, to generate the federated identity configuration files
for Exact Globe+.
Retrieving Microsoft Entra ID configuration details
To retrieve your Microsoft Entra ID configuration details, log in to your Microsoft Entra ID account and view the Microsoft Entra ID application or client that you have configured for
Exact Globe+.
For more information on how to retrieve these details, see How-to: Retrieving information for Microsoft Entra ID.
Note: All
values are case-sensitive; you should use the exact value, including any
symbols. You are advised to always use lowercase to avoid a mismatch of the
values.
Configuring the Microsoft Entra ID configuration files for Exact Globe+
To configure Exact Globe+ to use Microsoft Entra ID as the authentication
provider, the web application must have the following files configured for the
token-based authentication:
- Bin\EntityServiceIdentity.config
- Bin\GlobeIdentity.Config
- XMD\Exact.WindowsService.config
These files should be configured and generated by the Federated
Identity Configurator.
- Start the Federated Identity Configurator, by starting FIDConfigurator.exe in the
Cab folder of the Exact Globe+ installation folder. The tool requires read and write access to the installed
folders of Exact software. Therefore, it is recommended the tool be used with
Administrator privileges.
- Select Exact Globe+ from the Products menu on the left.
- Type or select the installation directory of Exact Globe+ at
Installation
Folder. When a path is specified, the tool will validate the path. If the
path is validated successfully, the configuration section and buttons will be
enabled.
- Select Microsoft Entra ID at the Identity Provider
field.
- Define the following fields:
- SAML
Issuer Name
- Client
ID
- Resource
- Allowed
Audience (this field will automatically be filled, based on the value defined
at Resource)
- Metadata
- Thumbprint
- Authority
- Click Validate. The
validation screen will be displayed.
- The values from the product screen will be checked for common
mistakes, such as formatting, typos, and other mistakes. The tool will warn you when a
value is suspected to be wrong so that you can verify and correct it if needed.
- Type a username and password (from your federated identity
account) to test if the configuration values are correct for authentication
use.
- Click Validate.
- If the validation is successful, click Generate. The federated identity configuration files will be
generated in the installation folder for the product. It will also be retained
for future product updates.
Note:
- Only after a successful validation, the configuration files can be
generated.
- All values are case-sensitive; you should use the exact value,
including any symbols. You are advised to always use lowercase to avoid a
mismatch of the values.
- For more information on how to retrieve these details, see
How-to: Retrieving information for Microsoft Entra ID.
- The tool requires read and write access to the installed folders
of Exact software. Therefore, it is recommended the tool be used with
Administrator privileges.
- For more information about the Federated Identity Configurator,
see Configure your Exact products to use Microsoft Entra ID (Federated Identity).
Additional information
Restarting the Exact Entity service
After generating the federated identity configuration files, the
Exact Entity Service should be restarted.
- Open services.msc.
- Restart Exact Entity Service.
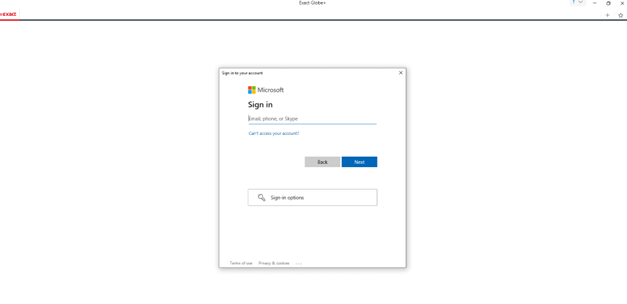
Exact Globe+ login
When the Exact Globe+ services are configured to use the
federated identity authentication, the Exact Globe+ application should be
configured the same way.
The login
screen will be displayed for Microsoft Entra ID when starting Exact Globe+. You have to select an account in the login
screen.
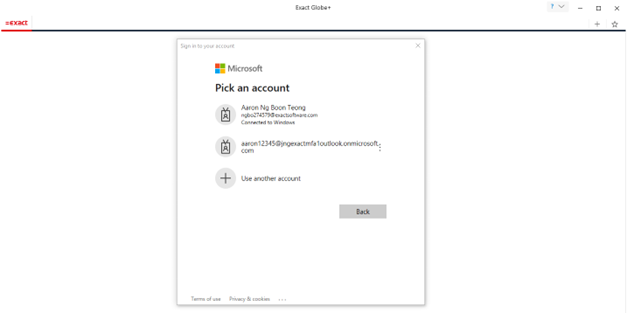
Once you have selected an account you will be prompted to enter the authentication code if you have enabled Multifactor authentication (MFA).
| Main Category: |
Attachments & notes |
Document Type: |
Support - On-line help |
| Category: |
|
Security level: |
All - 0 |
| Sub category: |
|
Document ID: |
27.183.654 |
| Assortment: |
Exact Globe+
|
Date: |
07-02-2025 |
| Release: |
|
Attachment: |
|
| Disclaimer |